부팅부터 페이징까지
목차
바닥부터 직접 만드는 RISC-V 토이 커널 연재. 이 글은 1편, 부팅과 페이징(가상메모리)입니다.
0. 들어가며
운영체제가 안에서 어떻게 도는지 제대로 알고 싶어서, C로 바닥부터 커널을 만들기로 했습니다.
타겟은 RISC-V(rv64), 에뮬레이터는 QEMU의 virt 머신, 참고서는 xv6(MIT 6.S081)입니다.
이 글은 그 커널의 첫 골격을 세웁니다.
정확히 무엇을 세우느냐면, 전원이 들어온 직후의 CPU를 받아서, 출력·인터럽트·입력·메모리 관리라는 네 기둥을 차례로 올리고, 마지막에 페이징(가상메모리) 까지 켜는 것입니다.
쌓는 순서는 출력 → 트랩·타이머 → 입력 → 페이지 할당기 → 페이징이고, 그 이유는 각 단계가 다음 단계의 전제이기 때문입니다. 출력이 있어야 디버깅을 하고, 타이머가 있어야 시간이 흐르고, 입력이 있어야 셸을 돌리고, 할당기가 있어야 페이지 테이블을 지을 수 있습니다.
페이징은 맨 마지막에 오는데, 그 앞의 모든 것을 전제로 깔기 때문입니다.
왜 C/RISC-V인가: 커널의 정석 언어는 C이고(리눅스·xv6·BSD 전부 C), 참고서 xv6도 C/RISC-V라 코드가 1:1로 매핑돼 마찰이 가장 적습니다. RISC-V는 ISA가 단순해 학습에 좋고, 맥(애플 실리콘)에서
riscv64-elf-gcc로 툴체인도 깔끔하게 잡힙니다.
이 연재는 xv6의 학습 랩을 직접 구현해온 기록입니다.
부팅·페이징부터 프로세스·시스템콜·파일시스템, 그 위의 demand paging·mmap·copy-on-write, 멀티코어와 네트워크(UDP·TCP), 유저 스레드까지, OS의 핵심을 한 조각씩 손으로 만들어 봅니다.
(전체 진행 상황과 앞으로의 주제는 저장소 README의 로드맵에 정리돼 있습니다.)
RISC-V의 좋은 점 하나: -nographic으로 돌리면 UART가 그대로 터미널 stdout으로 나와서, 스크린샷 없이 출력을 바로 확인할 수 있습니다.
1. 부팅 + UART 출력: CPU를 받아 첫 글자를 찍기까지
커널이 처음 실행될 때 풀어야 하는 진짜 문제
CPU에 전원이 들어왔습니다. 그런데 “내 코드”는 어떻게, 어느 모드에서, 어느 주소에서 처음 실행될까요?
x86이라면 BIOS·부트로더의 미로를 통과해야 합니다.
RISC-V는 그 단계를 OpenSBI라는 펌웨어가 표준화해 둬서 훨씬 깔끔합니다. (SBI = Supervisor Binary Interface, OS와 펌웨어 사이의 표준 호출 규약이고, OpenSBI는 그 구현체입니다.)
QEMU virt를 켜면 OpenSBI가 먼저 M-mode(머신 모드, 최고 권한) 셋업을 끝내고, 우리 커널을 0x8020_0000으로 S-mode(슈퍼바이저 모드)에서 점프시킵니다.
여기서 0x8020_0000은 RAM이 시작하는 0x8000_0000에서 2MB 뒤입니다. 앞쪽 2MB엔 OpenSBI가 자리 잡고, 그 뒤부터가 우리 커널 몫입니다. (RISC-V엔 고정된 “0번지 RAM”이 없고, QEMU virt가 RAM을 0x8000_0000부터 배치하기 때문에 이 숫자가 나옵니다.)
OpenSBI v1.5.1 ...Domain0 Next Address : 0x0000000080200000 ← 우리 커널로Domain0 Next Mode : S-mode그래서 우리가 할 일은 두 가지뿐입니다. 커널을 그 주소(0x8020_0000)에 링크하고, 진입점에서 스택만 잡아 C로 넘어가는 것입니다.
이 커널은 처음부터 멀티코어(하트, hart, 즉 “HARdware Thread”로 RISC-V에서 CPU 코어 하나를 부르는 말)를 염두에 둬서, 진입점이 코어마다 자기 스택을 잡습니다.
# entry.S — OpenSBI가 a0=hartid로 여기로 점프시킨다_entry: mv tp, a0 # tp = hartid csrw sscratch, a0 # 트랩 때 hartid 복구용으로 보관 # 코어별 스택: sp = stacks + (hartid + 1) * 4096 (스택 top) la sp, stacks li t0, 4096 addi t1, a0, 1 mul t0, t0, t1 add sp, sp, t0 call kmain # C 커널 시작명령어를 하나하나 외울 필요는 없습니다. 이 블록이 통째로 하는 일은 “C로 넘어가기 전 최소 준비” 하나입니다:
- OpenSBI가 준 코어 번호(hartid) 를 챙겨 둔다 (
tp에 두고, 트랩 때 되찾으려sscratch에도 백업하는데, 5편에서 이게 버그의 핵심이 됩니다) - 코어마다 겹치지 않는 자기 스택을 잡는다 (
sp를 자기 구간 꼭대기로) call kmain으로 C로 작성된 커널 본체 함수kmain에 진입한다. 스택이 잡혔으니 이제 평범한 C입니다
왜 스택부터 잡나? C 함수는 지역변수와 복귀 주소를 스택에 쌓는데, 부팅 직후엔 그 스택이 아직 없습니다. 그래서 C(
kmain)로 넘어가기 전에 어셈블리로sp한 줄만 세팅하는 겁니다.
핵심 질문에 대한 답: 부트로더를 직접 안 짜도 되는 이유는 OpenSBI가 M-mode 초기화와 SBI 서비스를 제공하기 때문이고, 우리는 S-mode에서 깨끗하게 시작합니다. 스택 한 줄만 잡으면 그다음부터는 평범한 C입니다.
화면 출력: 메모리에 글자를 “쓰면” 화면에 나온다
출력은 가장 원초적인 방법으로 합니다. 메모리 매핑된 UART(0x1000_0000)에 직접 쓰는 방식입니다. (이렇게 장치 레지스터를 메모리 주소처럼 읽고 쓰는 방식을 MMIO, memory-mapped I/O라고 합니다.)
RISC-V virt에서는 장치 레지스터가 메모리 주소에 매핑돼 있어서, 그 주소에 바이트를 쓰는 게 곧 “글자를 보내라”는 명령입니다.
QEMU virt 환경에서는 UART가 이미 사용 가능한 상태이고, OpenSBI도 같은 UART를 콘솔로 씁니다. 그래서 별도 초기화 없이 송신 레지스터에 쓰기만 해도 출력됩니다. (우리는 SBI 콘솔 호출을 거치지 않고 MMIO에 직접 쓰는, 즉 OpenSBI와 같은 장치를 공유하는 방식입니다. 실제 하드웨어라면 충돌 소지가 있지만 QEMU virt에선 안전합니다.)
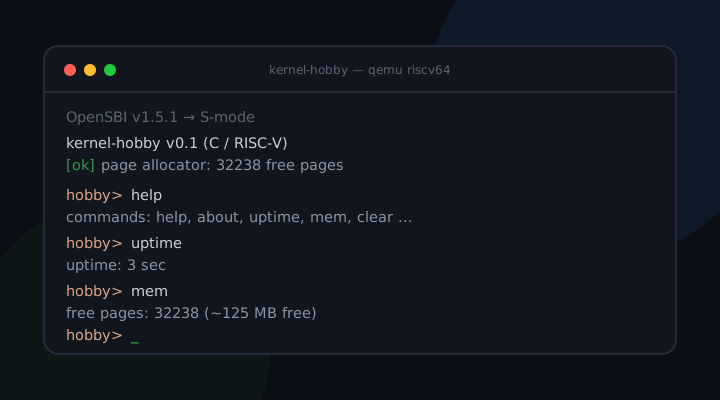
#define UART0 0x10000000Lvoid uart_putc(char c) { while ((uart[UART_LSR] & LSR_TX_IDLE) == 0) ; // 송신 버퍼 빌 때까지 대기 uart[UART_THR] = c; // THR에 쓰면 한 글자 전송}======================================== kernel-hobby v0.1 (C / RISC-V) booted in S-mode under OpenSBI========================================이 줄이 떴다는 건 “전원 → OpenSBI → S-mode 진입 → 스택 → C → UART”의 사슬이 전부 이어졌다는 뜻입니다.
이제 디버깅 수단이 생겼으니 나머지를 올릴 수 있습니다.
2. 트랩/인터럽트 + 타이머: 시간을 흐르게 하기
트랩이 풀어야 하는 진짜 문제
CPU가 코드를 한 줄씩 실행하는 도중에 “타이머가 울렸다”, “키가 눌렸다”, “잘못된 주소를 건드렸다” 같은 일이 끼어들면, 실행 흐름을 어떻게 안전하게 가로채고 되돌릴까요?
이 가로채기를 통틀어 트랩(trap) 이라고 부릅니다.
트랩에는 크게 세 종류가 있습니다. 외부에서 비동기로 오는 인터럽트(타이머·장치), 명령 실행이 만든 예외(페이지 폴트·잘못된 명령), 그리고 유저가 일부러 일으키는 시스템콜(다음 글 주제)입니다.
CPU가 트랩을 만나면 stvec(Supervisor Trap-Vector, 트랩이 나면 점프할 핸들러 주소를 담아 두는 CSR) 레지스터가 가리키는 핸들러로 점프합니다.
거기서 레지스터를 전부 저장하고, C 핸들러를 부른 뒤, 복원하고 sret(Supervisor RETurn, 트랩에서 빠져나와 직전 모드·위치로 돌아가는 명령)로 원래 흐름에 복귀합니다.
저장·복원은 어셈블리(kernelvec.S)가 맡고, 판단은 C가 합니다.
// trap.c — kernelvec.S가 레지스터를 저장한 뒤 호출한다void kerneltrap(struct regframe *f) { uint64 cause = r_scause(); if (cause & SCAUSE_INTERRUPT) { uint64 code = cause & 0xff; if (code == SCAUSE_S_TIMER) { ticks++; w_stimecmp(r_time() + TIMER_INTERVAL); // 다음 타이머 예약 if (current_proc()) yield(); // 실행 중 스레드를 선점 } else if (code == SCAUSE_S_EXTERNAL) { // 장치 인터럽트 — 3절에서 } } // ... 예외/시스템콜은 아래 절·다음 글에서}scause의 최상위 비트가 인터럽트냐 예외냐를 구분하고, 하위 코드가 종류를 알려줍니다(Supervisor Timer Interrupt, 인터럽트 코드 5; 같은 5라도 예외 코드 5는 Load access fault라 그냥 “코드 5”라고만 하면 헷갈리기 쉽습니다).
타이머: “다음 알람 시각”을 직접 쓴다
주기적인 틱은 어떻게 만들까요?
Sstc 확장을 지원하는 환경에서는 stimecmp CSR(제어·상태 레지스터, satp·stvec처럼 CPU 설정·상태를 담는 특수 레지스터로 전용 명령으로만 읽고 씀)에 “다음 인터럽트를 울릴 시각”을 직접 적을 수 있습니다. (Sstc가 없으면 SBI 타이머 호출로 M-mode(OpenSBI)가 대신 예약하는 게 기본이고, Sstc는 그 오버헤드를 없애려 S-mode가 직접 쓰게 한 확장입니다. QEMU virt + 최근 OpenSBI는 Sstc를 지원합니다.)
현재 시각(r_time())에 간격을 더해 써 두면, 그 시각이 되는 순간 타이머 인터럽트가 발생합니다.
핸들러는 틱을 올리고 즉시 다음 알람을 다시 예약해서 주기를 유지합니다.
#define TIMER_INTERVAL 1000000UL // QEMU virt 타이머는 10MHz → 0.1초void timer_init(void) { w_stimecmp(r_time() + TIMER_INTERVAL); // 첫 타이머 예약}여기에 한 줄이 더 있습니다. 타이머가 울릴 때마다 yield()로 실행 중인 스레드를 스케줄러에 양보합니다.
이게 선점형 멀티태스킹의 씨앗입니다. 지금은 셸 하나뿐이라 티가 안 나지만, 프로세스가 여럿이 되는 다음 글부터 이 한 줄이 “한 프로세스가 CPU를 독점하지 못하게” 막는 핵심이 됩니다.
트랩은 커널의 모든 비동기 일의 단일 입구입니다. 타이머, 키보드, 페이지 폴트, 시스템콜이 전부 같은 문(
stvec→kerneltrap)으로 들어와scause로 갈립니다.
3. 키보드 입력 + 셸: 인터랙티브해지기
외부 인터럽트가 풀어야 하는 문제
키보드는 언제 눌릴지 모릅니다. CPU가 바쁠 때 키가 눌리면 그 신호를 누가 받아서 어떻게 커널에 전달할까요?
장치가 여럿이면 인터럽트도 여럿이라, 누가 울렸는지 가려내고 우선순위를 정할 중재자가 필요합니다.
그 역할이 PLIC(Platform-Level Interrupt Controller)입니다.
키보드 입력(이 커널에선 UART 수신)은 PLIC을 거쳐 S-mode 외부 인터럽트(코드 9)로 들어옵니다.
핸들러는 세 박자로 움직입니다. PLIC에 “누가 울렸냐”고 묻고(claim), 그게 UART면 받은 글자를 읽어 셸에 넘기고, “처리 끝”을 알립니다(complete).
// trap.c — 외부 인터럽트 분기} else if (code == SCAUSE_S_EXTERNAL) { int irq = plic_claim(); // 누가 울렸나 if (irq == UART0_IRQ) uart_intr(); // 받은 글자 → shell_input() if (irq) plic_complete(irq); // 처리 완료 통보}셸: libc 없이 손으로
셸은 글자를 모아 한 줄을 만들고, Enter에서 명령을 실행합니다.
libc가 없으니 문자열 비교조차 직접 짭니다.
type 'help' for commands.hobby> helpcommands: help, about, uptime, mem, clear, whoami, echo <text>hobby> uptimeuptime: 3 secuptime이 동작한다는 게 의외로 중요한 신호입니다.
셸이 입력을 기다리며 도는 동안에도 타이머 인터럽트가 동시에 끼어들어 틱을 세고 있다는 뜻입니다.
2절의 트랩과 3절의 입력이 한 CPU 위에서 번갈아 도는 게 눈으로 확인되는 순간입니다.
4. 물리 페이지 할당기: RAM을 나눠 쓰는 법
가상메모리로 가기 전에, 먼저 물리 메모리(RAM) 를 다룰 줄 알아야 합니다.
페이징이 쓸 페이지 테이블도 결국 이 할당기가 떼어 주는 RAM 한 조각 위에 지어집니다.
물리 페이지 할당기가 풀어야 하는 진짜 문제
빈 RAM은 그냥 거대한 바이트 배열입니다. 이걸 “누구에게 얼마나, 어디를 떼어 줄지” 어떻게 관리할까요?
QEMU virt는 128MB를 주는데, 주소로 보면 0x8000_0000부터 0x8800_0000까지입니다.
그 앞부분엔 OpenSBI(펌웨어)와 우리 커널 이미지가 이미 들어앉아 있고, 그 뒤(링커가 정의한 end부터 PHYSTOP까지)가 우리가 자유롭게 쓸 수 있는 빈 RAM입니다.
관리해야 할 요청은 두 가지로 압축됩니다.
- “메모리 한 조각 줘”(
kalloc): 페이지 테이블, 프로세스 스택, 나중엔 유저 페이지가 전부 여기서 한 덩어리씩 떼어 갑니다. - “다 썼으니 돌려줄게”(
kfree): 반납된 조각은 다음 요청에 재사용돼야 합니다.
설계: 4KB 페이지 + free list
빈 RAM을 4KB짜리 “물리 페이지(physical page)” 단위로 잘게 쪼갭니다.
왜 하필 4KB냐면, 곧 만들 페이징의 단위가 4KB라서 둘을 맞추면 관리가 깔끔하기 때문입니다.
잘라낸 페이지들을 free list(빈 페이지를 잇는 연결 리스트)로 엮어 두고, 필요하면 앞에서 하나 떼주고(kalloc) 다 쓰면 다시 앞에 끼워 넣습니다(kfree).
리스트의 next 포인터를 어디 둘까요?
빈 페이지 그 자체의 첫 8바이트에 둡니다. 어차피 빈 메모리니까 따로 메타데이터 공간이 필요 없습니다.
// kalloc.c — 빈 페이지 첫 8바이트에 다음 빈 페이지 주소를 저장struct run { struct run *next; };static struct run *freelist = 0;
void *kalloc(void) { acquire(&kmem_lock); // 여러 코어가 동시에 할당하므로 락 struct run *r = freelist; if (r) { freelist = r->next; // 맨 앞 페이지를 꺼낸다 freecnt--; refcnt[refidx(r)] = 1; // 새 페이지의 참조 카운트를 1로 초기화 } release(&kmem_lock); return (void *)r; // 0이면 메모리 부족}초기화(kinit)는 end부터 PHYSTOP까지 4KB씩 순회하며 전부 kfree로 free list에 밀어 넣는 것뿐입니다.
kalloc/kfree가 각각 O(1)인 이유가 여기 있습니다. 그냥 리스트 머리에서 떼고 머리에 붙이기 때문입니다.
흔한 오해 정정:
kfree에refcnt(참조 카운트)가 보여서 “벌써 가비지 컬렉션이냐?”고 놀랄 수 있는데, 아닙니다. 이건 한 물리 페이지를 여러 주소공간이 공유하는 copy-on-write(8편)를 위한 장치라, 공유 중인 페이지(refcnt > 1)는 반납하지 않고 카운트만 깎습니다. 이 글 범위에선 모든 페이지의refcnt가 1이라 평범한 free list처럼 동작합니다.
hobby> memfree pages: 32238 (~125 MB free)128MB RAM에서 OpenSBI와 커널을 뺀 약 125MB가 32238개의 물리 페이지로 잡혔습니다.
이 페이지들이 다음 절에서 가상주소가 가리킬 “진짜 RAM”이 됩니다.
5. 페이징 (Sv39): 가상메모리의 토대
이제 이 커널의 가장 중요한 개념, 가상메모리(virtual memory) 입니다.
가상메모리가 풀어야 하는 진짜 문제
방금까지 우리는 주소를 물리주소 그대로 썼습니다.
0x8020_0000이라고 하면 진짜 그 RAM 칸입니다. 프로그램이 하나뿐이면 괜찮은데, 여럿이면 무엇이 깨질까요?
깨지는 경우는 세 가지입니다.
- 충돌: 두 프로그램이 둘 다 주소
0x1000에 변수를 두고 싶어 하면? 같은 물리 칸을 두고 싸웁니다. - 보호: 프로그램 A의 버그가
0x8020_0000에 막 쓰면 커널이나 프로그램 B의 메모리를 망가뜨립니다. - 유연성: “연속된 큰 메모리가 필요한데 RAM은 조각조각 흩어져 있다”면 어떻게 줄까요?
해결책은 한 줄로 요약됩니다. 각 프로그램에게 “나만의 메모리”라는 환상을 준다.
프로그램은 0x1000부터 시작하는 깨끗한 자기만의 주소공간을 보지만, 그 주소는 진짜가 아닌 가짜(가상) 주소입니다.
CPU는 메모리에 접근할 때 이 가상주소를 실제 물리주소로 몰래 번역해 줍니다(대부분은 번역 캐시인 TLB에서 바로 가져오고, TLB가 빗나갈 때만 페이지 테이블을 따라갑니다).
A의 0x1000과 B의 0x1000은 서로 다른 물리 페이지로 번역되니, 같은 주소를 써도 안 부딪힙니다.
흔한 오해 정정: “페이징 = 스왑(디스크로 내보내기)“이라고 묶어 생각하기 쉬운데, 둘은 층이 다릅니다. 페이징은 가상주소를 물리주소로 번역하는 메커니즘이고, 스왑은 그 메커니즘 위에서 “지금 물리 페이지가 없으면 디스크에서 가져온다”는 한 가지 응용일 뿐입니다. 이 커널은 페이징은 켜지만 스왑은 안 합니다. 번역만으로도 격리·보호·유연성을 다 얻기 때문입니다.
물리주소 직접 사용 vs 가상메모리(페이징)
| 구분 | 물리주소 직접 사용 | 가상메모리(페이징) |
|---|---|---|
| 주소가 가리키는 것 | 진짜 RAM 칸 | 번역을 거친 뒤의 RAM 칸 |
| 프로세스 격리 | 불가능 (같은 주소 = 같은 칸) | 가능 (주소공간마다 다른 번역 표) |
| 보호 | 없음 (누구나 어디든 쓰기) | PTE 권한 비트로 영역별 통제 |
| 메모리 단편화 | 연속 영역 확보가 어려움 | 흩어진 물리 페이지를 연속 가상주소로 |
| 비용 | 0 (번역 없음) | 번역 1회 + 페이지 테이블 메모리 + TLB miss |
공짜는 아닙니다. 접근마다 번역이 끼고, 페이지 테이블이 RAM을 먹고, 번역 캐시(TLB)가 빗나가면 느려집니다.
그럼에도 거의 모든 현대 OS가 페이징을 쓰는 이유는, 위 표의 격리·보호·유연성이 그 비용을 압도하기 때문입니다.
페이징: 번역의 메커니즘
그 번역을 페이지 단위로 하는 게 페이징(paging) 입니다.
가상 주소공간도, 물리 RAM도 똑같이 4KB 페이지로 나누고, “어느 가상 페이지가 어느 물리 페이지로 가는지”를 적은 표, 곧 페이지 테이블을 둡니다.
[가상 페이지] [페이지 테이블] [물리 페이지 (4절의 그 RAM 조각들)] va 0x1000 ──────▶ "0x1000 → 0x8021_3000" ──────▶ 실제 RAM 0x8021_3000 va 0x2000 ──────▶ "0x2000 → 0x8019_a000" ──────▶ 실제 RAM 0x8019_a000표의 한 칸이 PTE(Page Table Entry) 입니다.
PTE에는 “이 가상 페이지가 가리킬 물리 페이지 번호” + 권한 비트가 들어 있습니다.
V(valid): 이 매핑이 유효한가R/W/X: 읽기/쓰기/실행 허용U: 유저 모드에서 접근 가능 (← 나중에 프로세스 격리의 핵심)
권한 비트가 보호를 담당합니다.
코드 페이지는 R|X(읽기·실행, 쓰기 금지)로, 데이터는 R|W로 매핑하면, 코드를 실수로 덮어쓰는 버그가 폴트로 잡힙니다.
Sv39: 왜 한 장이 아니라 3단계 트리인가
39비트 가상 주소공간을 4KB 페이지로 나누면 페이지가 1억 개가 넘습니다. 이걸 한 장의 표로 만들면 표 자체가 기가바이트급입니다. 어떻게 작게 유지할까요?
RISC-V의 Sv39는 39비트 가상주소를 쓰고, 페이지 테이블을 3단계 트리로 둡니다(각 단계는 4KB, 512개 PTE, 4KB ÷ 8B = 512개).
실제로 프로그램이 쓰는 주소는 드문드문(sparse) 합니다. 코드도 조금, 스택도 조금, 힙도 조금입니다.
3단계 트리로 두면 실제로 쓰는 가지만 만들면 되니 표가 작아집니다.
번역은 가상주소를 9비트씩 세 조각으로 쪼개 트리를 세 번 따라 내려가는 일입니다.
코드로는 walk()가 그 일을 합니다. 중간 노드가 없는데 alloc이 켜져 있으면 그 자리에서 kalloc으로 한 장 만들어 채웁니다.
// vm.c — va에 해당하는 최하위 PTE 주소를 찾는다. 없으면 중간 테이블을 할당.static pte_t *walk(pagetable_t pagetable, uint64 va, int alloc) { for (int level = 2; level > 0; level--) { pte_t *pte = &pagetable[PX(level, va)]; // 9비트 인덱스 if (*pte & PTE_V) { pagetable = (pagetable_t)PTE2PA(*pte); // 다음 단계로 내려간다 } else { if (!alloc) return 0; pagetable = (pagetable_t)kalloc(); // 중간 노드를 그 자리에서 생성 if (pagetable == 0) return 0; memset(pagetable, 0, PGSIZE); *pte = PA2PTE(pagetable) | PTE_V; } } return &pagetable[PX(0, va)]; // leaf PTE}이 walk()가 4절의 물리 페이지 할당기를 처음으로 진짜 쓰는 곳입니다. 트리의 중간 노드가 곧 kalloc이 떼어 준 4KB 페이지이기 때문입니다.
이 글에선: 커널 식별 매핑
가상메모리의 진짜 힘(프로세스마다 다른 번역)은 유저 프로세스가 생기는 다음 글부터입니다. 그럼 이번 글에선 페이지 테이블을 어디에 쓸까요?
이번 글에선 커널 자신을 위한 페이지 테이블 한 장만 만듭니다.
그런데 여기엔 함정이 있습니다. 페이징을 켜는 순간부터 모든 주소가 번역되는데, 지금 실행 중인 커널 코드의 주소도 갑자기 바뀌면 그다음 명령을 못 찾아 죽습니다.
그래서 커널은 식별 매핑(identity mapping, va == pa) 을 씁니다.
“가상주소 0x8020_0000 → 물리주소 0x8020_0000”처럼 번역해도 같은 주소가 나오게 매핑하는 것입니다.
그러면 페이징을 켜도 커널 입장에선 아무것도 안 바뀐 것처럼 매끄럽게 이어집니다.
권한만 영역별로 다르게 줍니다. 코드는 R|X, 장치·데이터는 R|W로 매핑합니다.
// vm.c — 커널 영역을 "va == pa"로 식별 매핑 (권한만 영역별로 다르게)static void map_kernel(pagetable_t pt) { kvmmap(pt, UART0, UART0, PGSIZE, PTE_R | PTE_W); // UART: 읽기/쓰기 kvmmap(pt, PLIC, PLIC, 0x400000, PTE_R | PTE_W); // 인터럽트 컨트롤러 kvmmap(pt, KERNBASE, KERNBASE, // 커널 코드: 읽기/실행 (uint64)etext - KERNBASE, PTE_R | PTE_X); kvmmap(pt, (uint64)etext, (uint64)etext, // 데이터+빈 RAM: 읽기/쓰기 PHYSTOP - (uint64)etext, PTE_R | PTE_W);}(실제 코드엔 virtio-mmio 장치 매핑도 한 줄 더 있지만, 골자는 위와 같습니다.)
매핑을 다 만들었으면, 페이지 테이블의 물리주소를 satp 레지스터(Supervisor Address Translation and Protection, 지금 쓸 페이지 테이블을 가리키는 CSR)에 적재하고 sfence.vma로 TLB를 비우면 새 페이지 테이블이 적용됩니다. 그 순간 페이징이 켜집니다.
sfence.vma는 CPU가 캐시해 둔 옛 번역(TLB)을 비우는 명령입니다. 매핑을 바꿨으니 옛 캐시를 버리라는 뜻입니다.
void kvminithart(void) { sfence_vma(); w_satp(MAKE_SATP(kernel_pagetable)); // 이 줄에서 페이징 ON (8=Sv39 모드 비트) sfence_vma();}[ok] paging enabled (Sv39 kernel page table)hobby> memfree pages: 32169 (~125 MB free)페이징을 켠 뒤에도 셸·타이머·입출력이 전부 그대로 동작합니다. 식별 매핑이라 번역은 일어나되 결과가 같은 물리주소(va == pa)로 나오기 때문입니다.
빈 페이지가 32238 → 32169로 약 69개 줄었는데, 그게 바로 walk()가 페이지 테이블 트리를 짓느라 kalloc으로 떼어 간 물리 페이지들입니다.
4절에서 만든 할당기가 5절에서 진짜 일을 한 것입니다. 두 절이 코드 한 줄(kalloc)로 맞물립니다.
한 장으로 정리
- 물리 페이지 = 진짜 RAM 4KB 조각 (
kalloc이 떼어 줌) - 가상 페이지 = 프로세스가 보는 주소공간의 4KB 조각 (가짜 주소)
- 페이지 테이블 / PTE = 가상 페이지 → 물리 페이지 번역 + 권한
- 페이징 = 그 번역을 페이지 단위로 하는 메커니즘
- 가상메모리 = 페이징으로 얻는 추상화(격리·보호·유연성)
가상메모리는 한 글로 끝나지 않습니다. 프로세스마다 다른 번역 표를 줘서 격리하는 건 2편, 페이지를 미리 안 주고 접근할 때 만드는 demand paging·mmap은 5편, 같은 물리 페이지를 공유하다 쓸 때 복제하는 copy-on-write는 8편에서 이어집니다.
정리
이 글은 전원이 들어온 CPU를 받아 인터랙티브 커널까지 골격을 세웠습니다. 다섯 기둥이 한 방향으로 쌓입니다.
- 부팅 + UART: OpenSBI가 S-mode·
0x8020_0000로 넘겨주면, 스택만 잡고 C로 진입해 메모리 매핑 UART에 직접 써서 첫 글자를 찍습니다. - 트랩 + 타이머: 모든 비동기 일이
stvec→kerneltrap이라는 단일 입구로 들어와scause로 갈립니다.stimecmp로 주기 틱을 만들고, 그 틱에서yield()로 선점의 씨앗을 심습니다. - PLIC 입력 + 셸: 키 입력이 외부 인터럽트로 들어오고(claim → 처리 → complete),
uptime이 도는 건 입력과 타이머가 한 CPU에서 동시에 산다는 증거입니다. - 물리 페이지 할당기: 빈 RAM을 4KB 페이지로 쪼개 free list로 관리합니다.
kalloc/kfree가 O(1)이고, 이게 페이지 테이블의 토대가 됩니다. - Sv39 페이징: 가상주소를 물리주소로 번역하는 메커니즘입니다. 이 글에선 커널 식별 매핑(va == pa)으로 켜서, 페이징을 켜도 커널이 매끄럽게 이어지게 했습니다.
순서가 핵심입니다. 앞 절에서 만든 것이 다음 절의 기반이 됩니다. UART는 디버깅을 가능하게 하고, 트랩은 비동기를 처리하며, 할당기는 페이지 테이블을 만들고, 그 위에서 비로소 가상메모리가 동작합니다. 페이징이 맨 마지막에 오는 건, 그 앞의 모든 것(특히 4절의 할당기)을 전제로 깔기 때문입니다.
make run으로 직접 부팅해 명령어를 칠 수 있는 커널이 됐고, 다음 글에서는 OS를 OS답게 만드는 경계, 곧 유저모드와 시스템콜로 들어갑니다.
코드: github.com/dj258255/kernel-hobby
다음 글: 유저모드 + 시스템콜 (예정)
참고 (1차 자료 우선)
- RISC-V Privileged Specification: S-mode,
satp/stvec/scause/stimecmp, Sv39 페이지 테이블의 1차 정의 - xv6: a simple, Unix-like teaching operating system (MIT 6.S081): 이 커널의 참고서.
kalloc/vm/trap이 1:1로 대응 - OpenSBI Documentation: M-mode 펌웨어, S-mode로의 인계, HSM(hart start) 확장
- QEMU
virtmachine: RAM 배치(0x8000_0000~), UART/PLIC/virtio MMIO 주소 - OSDev Wiki: 보조 자료

A RISC-V toy kernel built from scratch — a blog series. This is Part 1: booting and paging (virtual memory).
0. Introduction
I wanted to really understand how an operating system works under the hood, so I decided to build a kernel from scratch in C.
The target is RISC-V (rv64), the emulator is QEMU’s virt machine, and the reference is xv6 (MIT 6.S081).
This post raises the kernel’s first skeleton.
Concretely: take the CPU right after power-on, stack up four pillars in order — output, interrupts, input, memory management — and finally turn on paging (virtual memory).
We stack in the order output → traps/timer → input → page allocator → paging, because each step is a prerequisite for the next: output to debug, a timer for time to pass, input to run a shell, and a physical page allocator to build page tables.
Paging comes dead last precisely because it stands on everything before it.
Why C/RISC-V: C is the canonical language for kernels (Linux, xv6, and BSD are all C), and since the xv6 reference is also C/RISC-V, the code maps 1:1 with the least friction. RISC-V has a simple ISA that’s great for learning, and on a Mac (Apple Silicon) the toolchain sets up cleanly with
riscv64-elf-gcc.
This series is a record of implementing the xv6 learning labs from scratch.
From boot and paging through processes, system calls, and a filesystem, then demand paging, mmap, copy-on-write, multicore, networking (UDP·TCP), and user threads — building the core of an OS one piece at a time.
(Overall progress and upcoming topics are tracked in the repo’s README roadmap.)
One nice thing about RISC-V: running with -nographic sends UART straight to the terminal’s stdout, so you can check the output directly without screenshots.
1. Boot + UART output — From taking the CPU to printing the first character
The real problem the kernel must solve when it first runs
The CPU just powered on. But how, in which mode, and at which address does my code first run?
On x86 you’d thread through a maze of BIOS and bootloader.
RISC-V standardizes that stage behind a firmware called OpenSBI, which is far cleaner. (SBI = Supervisor Binary Interface — the standard call interface between an OS and firmware; OpenSBI is its implementation.)
When you start QEMU virt, OpenSBI first finishes the M-mode (machine mode, highest privilege) setup, then jumps to our kernel at 0x8020_0000 in S-mode (supervisor mode).
That 0x8020_0000 is 2MB past 0x8000_0000, where RAM begins — OpenSBI sits in the first 2MB, and our kernel gets everything after. (RISC-V has no fixed “RAM at address 0”; QEMU virt places RAM starting at 0x8000_0000, which is where this number comes from.)
OpenSBI v1.5.1 ...Domain0 Next Address : 0x0000000080200000 ← into our kernelDomain0 Next Mode : S-modeSo we only have two jobs — link the kernel at that address (0x8020_0000), and at the entry point just set up a stack and hand off to C.
This kernel is multicore-aware (harts — “HARdware Thread”, RISC-V’s name for a single CPU core) from the start, so the entry point gives each core its own stack.
# entry.S — OpenSBI jumps here with a0=hartid_entry: mv tp, a0 # tp = hartid csrw sscratch, a0 # keep hartid to restore on trap # per-core stack: sp = stacks + (hartid + 1) * 4096 (stack top) la sp, stacks li t0, 4096 addi t1, a0, 1 mul t0, t0, t1 add sp, sp, t0 call kmain # into the C kernelYou don’t need to memorize each instruction — as a whole, this block does one thing: the minimum setup before handing off to C:
- Stash the core number (hartid) OpenSBI handed us (in
tp, and backed up insscratchto recover on a trap — this becomes the crux of a bug in Part 5) - Give each core its own non-overlapping stack (point
spat the top of its slice) call kmainto enterkmain, the kernel’s main function written in C — now that a stack exists, it’s ordinary C from here
Why set up the stack first? C functions push local variables and return addresses onto a stack, but right after boot there is no stack yet. So before handing off to C (
kmain), we set upspin assembly — just one line.
Answer to the key question: we don’t write a bootloader because OpenSBI does the M-mode initialization and provides the SBI services for us, and we start cleanly in S-mode. One line to set up the stack, and from there on it’s ordinary C.
Screen output — “writing” a byte to memory shows it on screen
Output is done the most primitive way — writing directly to the memory-mapped UART (0x1000_0000). (Treating device registers as memory addresses like this is called MMIO, memory-mapped I/O.)
On RISC-V virt, device registers are mapped at memory addresses, so writing a byte to that address is the command “send this character.”
On QEMU virt the UART is already usable, and OpenSBI uses the same UART as its console — so with no extra initialization you can just write to the transmit register. (We don’t go through the SBI console call; we write the MMIO directly, i.e. we share the very device OpenSBI also uses — on real hardware that could conflict, but on QEMU virt it’s safe.)
#define UART0 0x10000000Lvoid uart_putc(char c) { while ((uart[UART_LSR] & LSR_TX_IDLE) == 0) ; // wait until the TX buffer is empty uart[UART_THR] = c; // writing THR sends one character}======================================== kernel-hobby v0.1 (C / RISC-V) booted in S-mode under OpenSBI========================================This line appearing means the chain “power → OpenSBI → S-mode entry → stack → C → UART” is fully connected.
Now that we have a debugging channel, we can raise the rest.
2. Traps/interrupts + timer — Making time flow
The real problem traps must solve
While the CPU runs code line by line, something cuts in — “the timer fired,” “a key was pressed,” “an illegal address was touched.” How do we safely intercept the flow and return to it?
This interception is collectively called a trap.
There are three broad kinds — asynchronous interrupts from outside (timer, devices), exceptions produced by an instruction (page fault, illegal instruction), and system calls a user intentionally raises (the next post’s topic).
When the CPU hits a trap, it jumps to the handler pointed to by the stvec (Supervisor Trap-Vector — the CSR holding the address of the trap handler) register.
There it saves all registers, calls a C handler, then restores them and returns to the original flow with sret (Supervisor RETurn — the instruction that leaves a trap and returns to the previous mode and location).
The save/restore is assembly (kernelvec.S); the decisions are C.
// trap.c — called after kernelvec.S saves the registersvoid kerneltrap(struct regframe *f) { uint64 cause = r_scause(); if (cause & SCAUSE_INTERRUPT) { uint64 code = cause & 0xff; if (code == SCAUSE_S_TIMER) { ticks++; w_stimecmp(r_time() + TIMER_INTERVAL); // schedule the next timer if (current_proc()) yield(); // preempt the running thread } else if (code == SCAUSE_S_EXTERNAL) { // device interrupt — see §3 } } // ... exceptions / syscalls below and in the next post}The top bit of scause distinguishes interrupt from exception, and the low code tells the kind (Supervisor Timer Interrupt — interrupt code 5; note that exception code 5 is a Load access fault, so a bare “code 5” is ambiguous).
Timer — write the “time of the next alarm” directly
How do we produce periodic ticks?
On a platform that supports the Sstc extension you can write the “time to fire the next interrupt” directly into the stimecmp CSR (control & status register — special registers like satp/stvec that hold CPU config/state and are accessed only via dedicated instructions). (Without Sstc, the default is an SBI timer call where M-mode (OpenSBI) schedules it on your behalf; Sstc removes that overhead by letting S-mode write the register itself. QEMU virt with a recent OpenSBI supports Sstc.)
Add an interval to the current time (r_time()) and write it, and a timer interrupt fires the moment that time arrives.
The handler bumps the tick count and immediately schedules the next alarm, keeping the period.
#define TIMER_INTERVAL 1000000UL // the QEMU virt timer is 10MHz → 0.1svoid timer_init(void) { w_stimecmp(r_time() + TIMER_INTERVAL); // schedule the first timer}There’s one more line — on every timer tick, yield() hands the running thread back to the scheduler.
This is the seed of preemptive multitasking. It’s invisible now with only a shell, but starting next post, once there are several processes, this one line is what stops a single process from monopolizing the CPU.
Traps are the single entry point for all the kernel’s asynchronous work. Timer, keyboard, page fault, and system call all come through the same door (
stvec→kerneltrap) and split onscause.
3. Keyboard input + shell — Becoming interactive
The problem external interrupts solve
A keystroke can come at any time. When a key is pressed while the CPU is busy, who catches that signal and how does it reach the kernel?
With multiple devices come multiple interrupts, so you need an arbiter to tell who fired and set priorities.
That role belongs to the PLIC (Platform-Level Interrupt Controller).
Keyboard input (UART receive, in this kernel) comes in through the PLIC as an S-mode external interrupt (code 9).
The handler moves in three beats — ask the PLIC “who fired” (claim), if it’s the UART read the received character and pass it to the shell, then signal “done” (complete).
// trap.c — external interrupt branch} else if (code == SCAUSE_S_EXTERNAL) { int irq = plic_claim(); // who fired if (irq == UART0_IRQ) uart_intr(); // received char → shell_input() if (irq) plic_complete(irq); // signal completion}Shell — by hand, without libc
The shell collects characters into a line and runs the command on Enter.
With no libc, even string comparison is written by hand.
type 'help' for commands.hobby> helpcommands: help, about, uptime, mem, clear, whoami, echo <text>hobby> uptimeuptime: 3 secThat uptime works is a surprisingly important signal.
It means that while the shell spins waiting for input, the timer interrupt cuts in concurrently and counts ticks.
This is the moment you can see §2’s traps and §3’s input taking turns on one CPU.
4. Physical page allocator — how to share out RAM
Before virtual memory, we first need to handle physical memory (RAM).
The page tables that paging will use are themselves built on a chunk of RAM this allocator hands out.
The real problem the physical page allocator must solve
Free RAM is just a giant array of bytes. How do we manage “who gets how much, and which part”?
QEMU virt gives 128MB, which in addresses runs from 0x8000_0000 to 0x8800_0000.
The front part is already occupied by OpenSBI (firmware) and our kernel image; the rest (from the linker-defined end to PHYSTOP) is free RAM we can use however we like.
The requests boil down to two.
- “Give me a chunk of memory” (
kalloc) — page tables, process stacks, and later user pages all carve a chunk out of here. - “I’m done, take it back” (
kfree) — a returned chunk must be reusable by the next request.
Design — 4KB pages + a free list
We slice the free RAM into 4KB “physical pages.”
Why 4KB? Because the paging we’re about to build uses a 4KB unit, and matching the two keeps management clean.
We string the sliced pages into a free list (a linked list of free pages), handing one off the front when needed (kalloc) and pushing it back when done (kfree).
Where do we store the list’s next pointer?
In the first 8 bytes of the free page itself — it’s free memory anyway, so we need no separate metadata.
// kalloc.c — store the next free-page address in the page's first 8 bytesstruct run { struct run *next; };static struct run *freelist = 0;
void *kalloc(void) { acquire(&kmem_lock); // multiple cores allocate concurrently → lock struct run *r = freelist; if (r) { freelist = r->next; // take the front page freecnt--; refcnt[refidx(r)] = 1; // initialize the new page's reference count to 1 } release(&kmem_lock); return (void *)r; // 0 means out of memory}Initialization (kinit) is just walking from end to PHYSTOP in 4KB steps, pushing each into the free list with kfree.
That’s why kalloc/kfree are each O(1) — pop from the head, push onto the head.
Common misconception fix: seeing
refcnt(a reference count) inkfreemight make you think “garbage collection already?” — it’s not. It’s machinery for copy-on-write (Part 8), where one physical page is shared by several address spaces, so a shared page (refcnt > 1) isn’t returned — only its count is decremented. Within this post’s scope every page hasrefcntof 1, so it behaves like a plain free list.
hobby> memfree pages: 32238 (~125 MB free)Of the 128MB of RAM, about 125MB (after OpenSBI and the kernel) becomes 32238 physical pages.
These pages are the “real RAM” that virtual addresses will point at in the next section.
5. Paging (Sv39) — the foundation of virtual memory
Now the most important concept in this kernel — virtual memory.
The real problem virtual memory must solve
Until now we used addresses as physical addresses directly. Say
0x8020_0000and you mean that actual RAM cell. With one program that’s fine — but with several, what breaks?
Three things break.
- Collision: if two programs both want a variable at address
0x1000, they fight over the same physical cell. - Protection: a bug in program A writing all over
0x8020_0000corrupts the kernel or program B. - Flexibility: what if you need a large contiguous region but RAM is scattered in fragments?
The fix is one line — give each program the illusion of “memory that’s all mine.”
A program sees its own clean address space starting at 0x1000, but those addresses aren’t real — they’re fake (virtual).
When the CPU touches memory, it quietly translates this virtual address into a real physical one (most of the time straight from the TLB, a translation cache; only on a TLB miss does it walk the page table).
A’s 0x1000 and B’s 0x1000 translate to different physical pages, so they never collide even using the same address.
Common misconception fix: it’s easy to lump “paging = swapping (pushing pages to disk),” but they sit at different layers. Paging is the mechanism that translates virtual addresses to physical ones; swapping is just one application on top of it — “if there’s no physical page right now, fetch it from disk.” This kernel turns paging on but does no swapping — translation alone already buys isolation, protection, and flexibility.
Physical addresses directly vs virtual memory (paging)
| Aspect | Physical addresses directly | Virtual memory (paging) |
|---|---|---|
| What an address points at | the actual RAM cell | the RAM cell after translation |
| Process isolation | impossible (same address = same cell) | possible (a different table per address space) |
| Protection | none (anyone can write anywhere) | per-region control via PTE permission bits |
| Fragmentation | hard to secure a contiguous region | scattered physical pages → contiguous virtual addresses |
| Cost | 0 (no translation) | one translation + page-table memory + TLB misses |
It isn’t free — every access incurs a translation, page tables eat RAM, and a translation-cache (TLB) miss is slow.
Nearly every modern OS still uses paging because the isolation, protection, and flexibility above overwhelm that cost.
Paging — the translation mechanism
Doing that translation in page-sized units is paging.
Both the virtual address space and physical RAM are split into 4KB pages, and a table — the page table — records “which virtual page maps to which physical page.”
[virtual page] [page table] [physical page (the RAM chunks from §4)] va 0x1000 ──────▶ "0x1000 → 0x8021_3000" ──────▶ real RAM 0x8021_3000 va 0x2000 ──────▶ "0x2000 → 0x8019_a000" ──────▶ real RAM 0x8019_a000One slot of the table is a PTE (Page Table Entry).
A PTE holds “the physical page number this virtual page points at” plus permission bits.
V(valid): is this mapping validR/W/X: read / write / execute allowedU: accessible from user mode (← later, the key to process isolation)
The permission bits provide protection.
Map code pages as R|X (read/execute, no write) and data as R|W, and a bug that accidentally overwrites code gets caught as a fault.
Sv39 — why a 3-level tree instead of one flat table
Splitting a 39-bit virtual address space into 4KB pages gives over 100 million pages. One flat table for that would itself be gigabytes. How do we keep it small?
RISC-V’s Sv39 uses 39-bit virtual addresses and a 3-level tree of page tables (each level 4KB, 512 PTEs — 4KB ÷ 8B = 512).
A program’s actually-used addresses are sparse — a little code, a little stack, a little heap.
With a 3-level tree you only build the branches you actually use, so the table stays small.
Translation chops the virtual address into three 9-bit slices and descends the tree three times.
In code, walk() does exactly that — if an intermediate node is missing and alloc is on, it makes one on the spot with kalloc.
// vm.c — find the leaf PTE for va; allocate intermediate tables if missingstatic pte_t *walk(pagetable_t pagetable, uint64 va, int alloc) { for (int level = 2; level > 0; level--) { pte_t *pte = &pagetable[PX(level, va)]; // 9-bit index if (*pte & PTE_V) { pagetable = (pagetable_t)PTE2PA(*pte); // descend to the next level } else { if (!alloc) return 0; pagetable = (pagetable_t)kalloc(); // create the intermediate node on the fly if (pagetable == 0) return 0; memset(pagetable, 0, PGSIZE); *pte = PA2PTE(pagetable) | PTE_V; } } return &pagetable[PX(0, va)]; // leaf PTE}This walk() is the first place §4’s physical page allocator does real work — an intermediate node of the tree is a 4KB page handed out by kalloc.
In this post — kernel identity mapping
Virtual memory’s real power (a different translation per process) starts in the next post, once user processes exist. So what do we use a page table for in this post?
Here we build just one page table, for the kernel itself.
And there’s a trap: the moment paging turns on, every address gets translated — including the address of the kernel code currently running. If that suddenly changes, the next instruction can’t be found and we die.
So the kernel uses identity mapping (va == pa).
Map “virtual 0x8020_0000 → physical 0x8020_0000” so that translation yields the same address.
Then turning paging on is seamless — from the kernel’s point of view nothing changed.
Only the permissions differ per region — code as R|X, devices and data as R|W.
// vm.c — identity-map the kernel "va == pa" (only the permissions differ per region)static void map_kernel(pagetable_t pt) { kvmmap(pt, UART0, UART0, PGSIZE, PTE_R | PTE_W); // UART: read/write kvmmap(pt, PLIC, PLIC, 0x400000, PTE_R | PTE_W); // interrupt controller kvmmap(pt, KERNBASE, KERNBASE, // kernel code: read/execute (uint64)etext - KERNBASE, PTE_R | PTE_X); kvmmap(pt, (uint64)etext, (uint64)etext, // data + free RAM: read/write PHYSTOP - (uint64)etext, PTE_R | PTE_W);}(The real code has one more line mapping the virtio-mmio devices, but the gist is the above.)
Once the mapping is built, loading the page table’s physical address into the satp register (Supervisor Address Translation and Protection — the CSR that points at the active page table) and flushing the TLB with sfence.vma applies the new page table — that’s the instant paging turns on.
sfence.vma flushes the CPU’s cached old translations (the TLB) — we changed the mapping, so throw away the old cache.
void kvminithart(void) { sfence_vma(); w_satp(MAKE_SATP(kernel_pagetable)); // this line turns paging ON (8 = the Sv39 mode bit) sfence_vma();}[ok] paging enabled (Sv39 kernel page table)hobby> memfree pages: 32169 (~125 MB free)Even after paging is on, the shell, timer, and I/O all keep working exactly as before — with identity mapping, translation still happens but yields the same physical address (va == pa).
Free pages dropped from 32238 to 32169, about 69 — and those are precisely the physical pages walk() carved out via kalloc to build the page table tree.
The allocator from §4 just did its real work in §5 — the two sections interlock on a single line of code (kalloc).
One screen to sum up
- Physical page = a real 4KB chunk of RAM (handed out by
kalloc) - Virtual page = a 4KB chunk of the address space a process sees (fake addresses)
- Page table / PTE = virtual page → physical page translation + permissions
- Paging = the mechanism that does that translation per page
- Virtual memory = the abstraction paging buys you (isolation, protection, flexibility)
Virtual memory doesn’t end in one post. Isolating processes by giving each a different translation table is Part 2; not handing pages out until they’re touched (demand paging / mmap) is Part 5; sharing a physical page and copying only on write (copy-on-write) is Part 8.
Wrap-up
This post took a freshly powered CPU and raised the skeleton up to an interactive kernel. Five pillars stack in one direction.
- Boot + UART — once OpenSBI hands off at S-mode and
0x8020_0000, set up a stack, enter C, and write directly to the memory-mapped UART to print the first character. - Trap + timer — all asynchronous work enters through one door (
stvec→kerneltrap) and splits onscause.stimecmpproduces periodic ticks, and that tick plants the seed of preemption viayield(). - PLIC input + shell — keystrokes arrive as external interrupts (claim → handle → complete), and
uptimerunning is proof that input and the timer live concurrently on one CPU. - Physical page allocator — slice free RAM into 4KB pages managed by a free list.
kalloc/kfreeare O(1), and this is the foundation for page tables. - Sv39 paging — the mechanism that translates virtual addresses to physical ones. This post turns it on with kernel identity mapping (va == pa), so the kernel continues seamlessly even with paging on.
The order is the point — each section becomes the ground the next one stands on. UART makes debugging possible, traps handle the asynchronous, the allocator builds page tables, and only on top of all that does virtual memory work. Paging comes last because it stands on everything before it (especially §4’s allocator).
With make run it boots into a kernel where you can type commands, and in the next post we get into the boundary that makes an OS an OS — user mode and system calls.
Code: github.com/dj258255/kernel-hobby
Next post: User mode + system calls (coming soon)
References (Primary Sources First)
- RISC-V Privileged Specification — the primary definition of S-mode,
satp/stvec/scause/stimecmp, and the Sv39 page table - xv6: a simple, Unix-like teaching operating system (MIT 6.S081) — this kernel’s reference;
kalloc/vm/trapmap 1:1 - OpenSBI Documentation — M-mode firmware, the handoff to S-mode, the HSM (hart start) extension
- QEMU
virtmachine — RAM layout (0x8000_0000~), UART/PLIC/virtio MMIO addresses - OSDev Wiki — supplementary reference
댓글
댓글 수정/삭제는 GitHub Discussions에서 가능합니다.