@CurrentUser 커스텀 어노테이션을 사용하는 이유
목차
Spring Security로 JWT 인증을 구현하면서 로그인한 사용자 정보를 컨트롤러에서 어떻게 가져올지 고민했습니다. 여러 방법을 비교해보고 @CurrentUser 커스텀 어노테이션을 만들어서 사용하기로 했는데, 그 과정을 정리해봤습니다.
로그인 객체를 가져오는 방법들
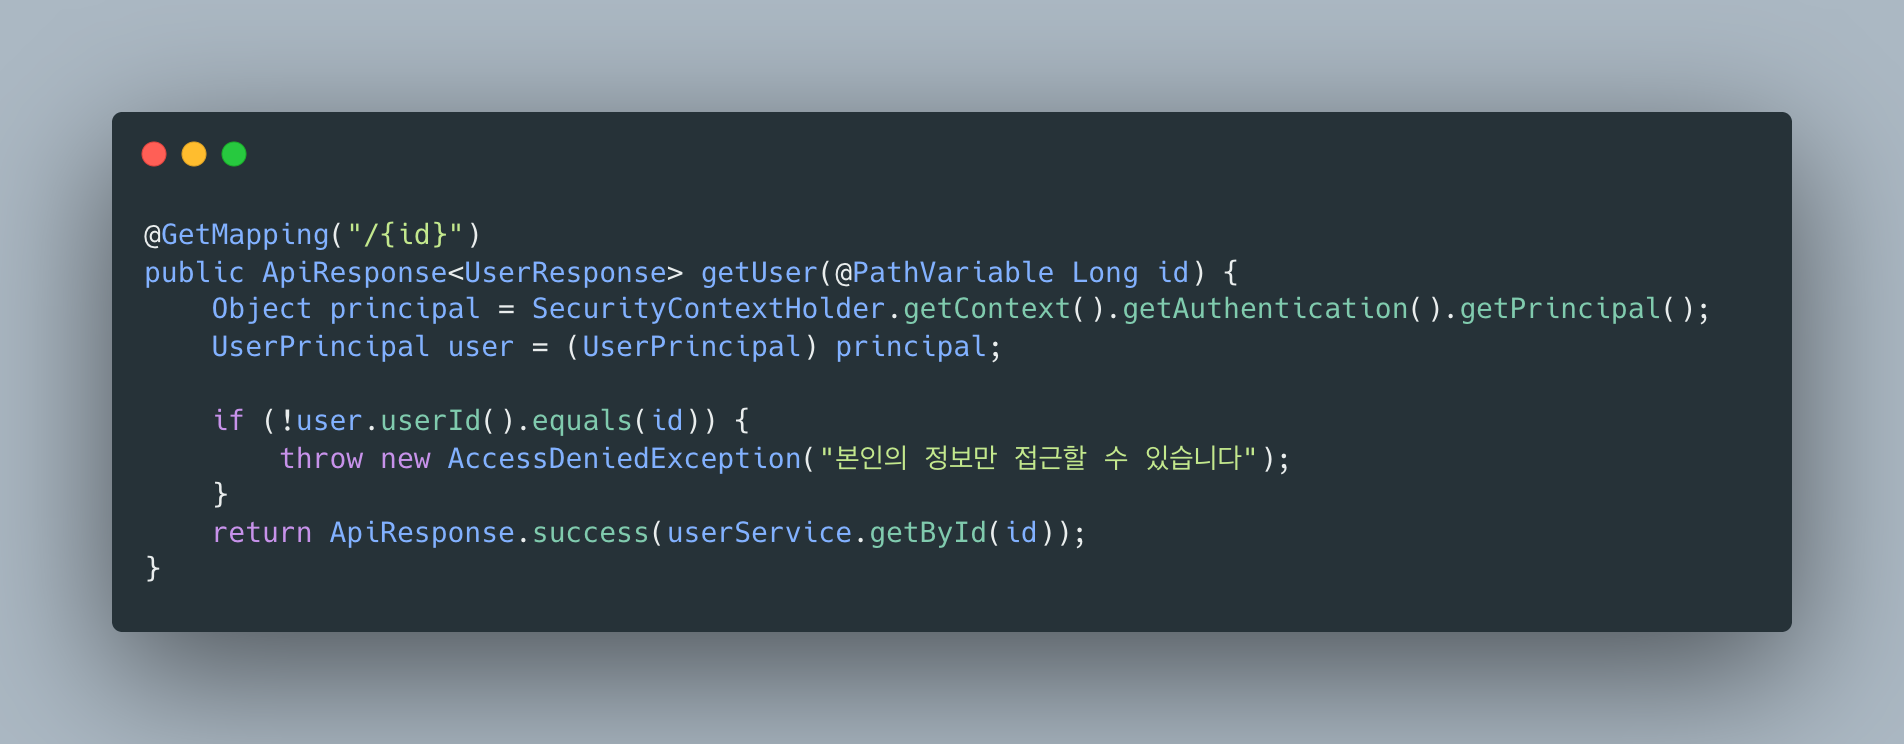
1. SecurityContextHolder에서 직접 가져오기
가장 원시적인 방법인데, 매번 이 코드를 작성해야 해서 번거롭습니다. null 체크도 직접 해야 하고, 테스트 코드 짜기도 까다롭습니다.
2. Controller 파라미터로 Principal 받기

Principal은 Java 표준 인터페이스라서 getName() 밖에 없습니다. userId나 role 같은 커스텀 정보를 쓸 수가 없어서 실용성이 떨어집니다.
3. @AuthenticationPrincipal 사용
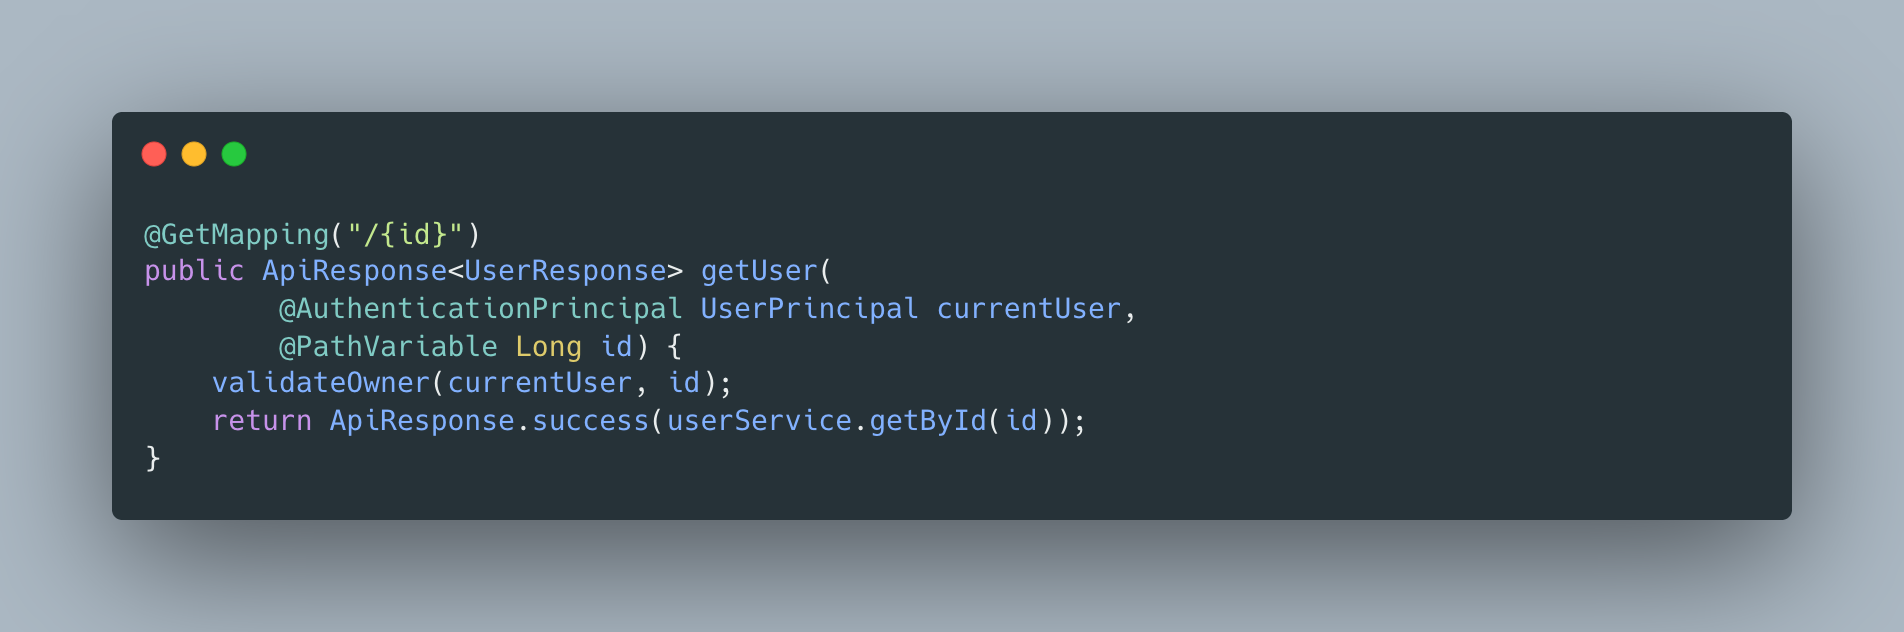
Spring Security 3.2부터 지원하는 방식입니다. 커스텀 로그인 객체를 바로 주입받을 수 있어서 제일 편합니다.
@AuthenticationPrincipal은 어떻게 동작할까?
AuthenticationPrincipalArgumentResolver
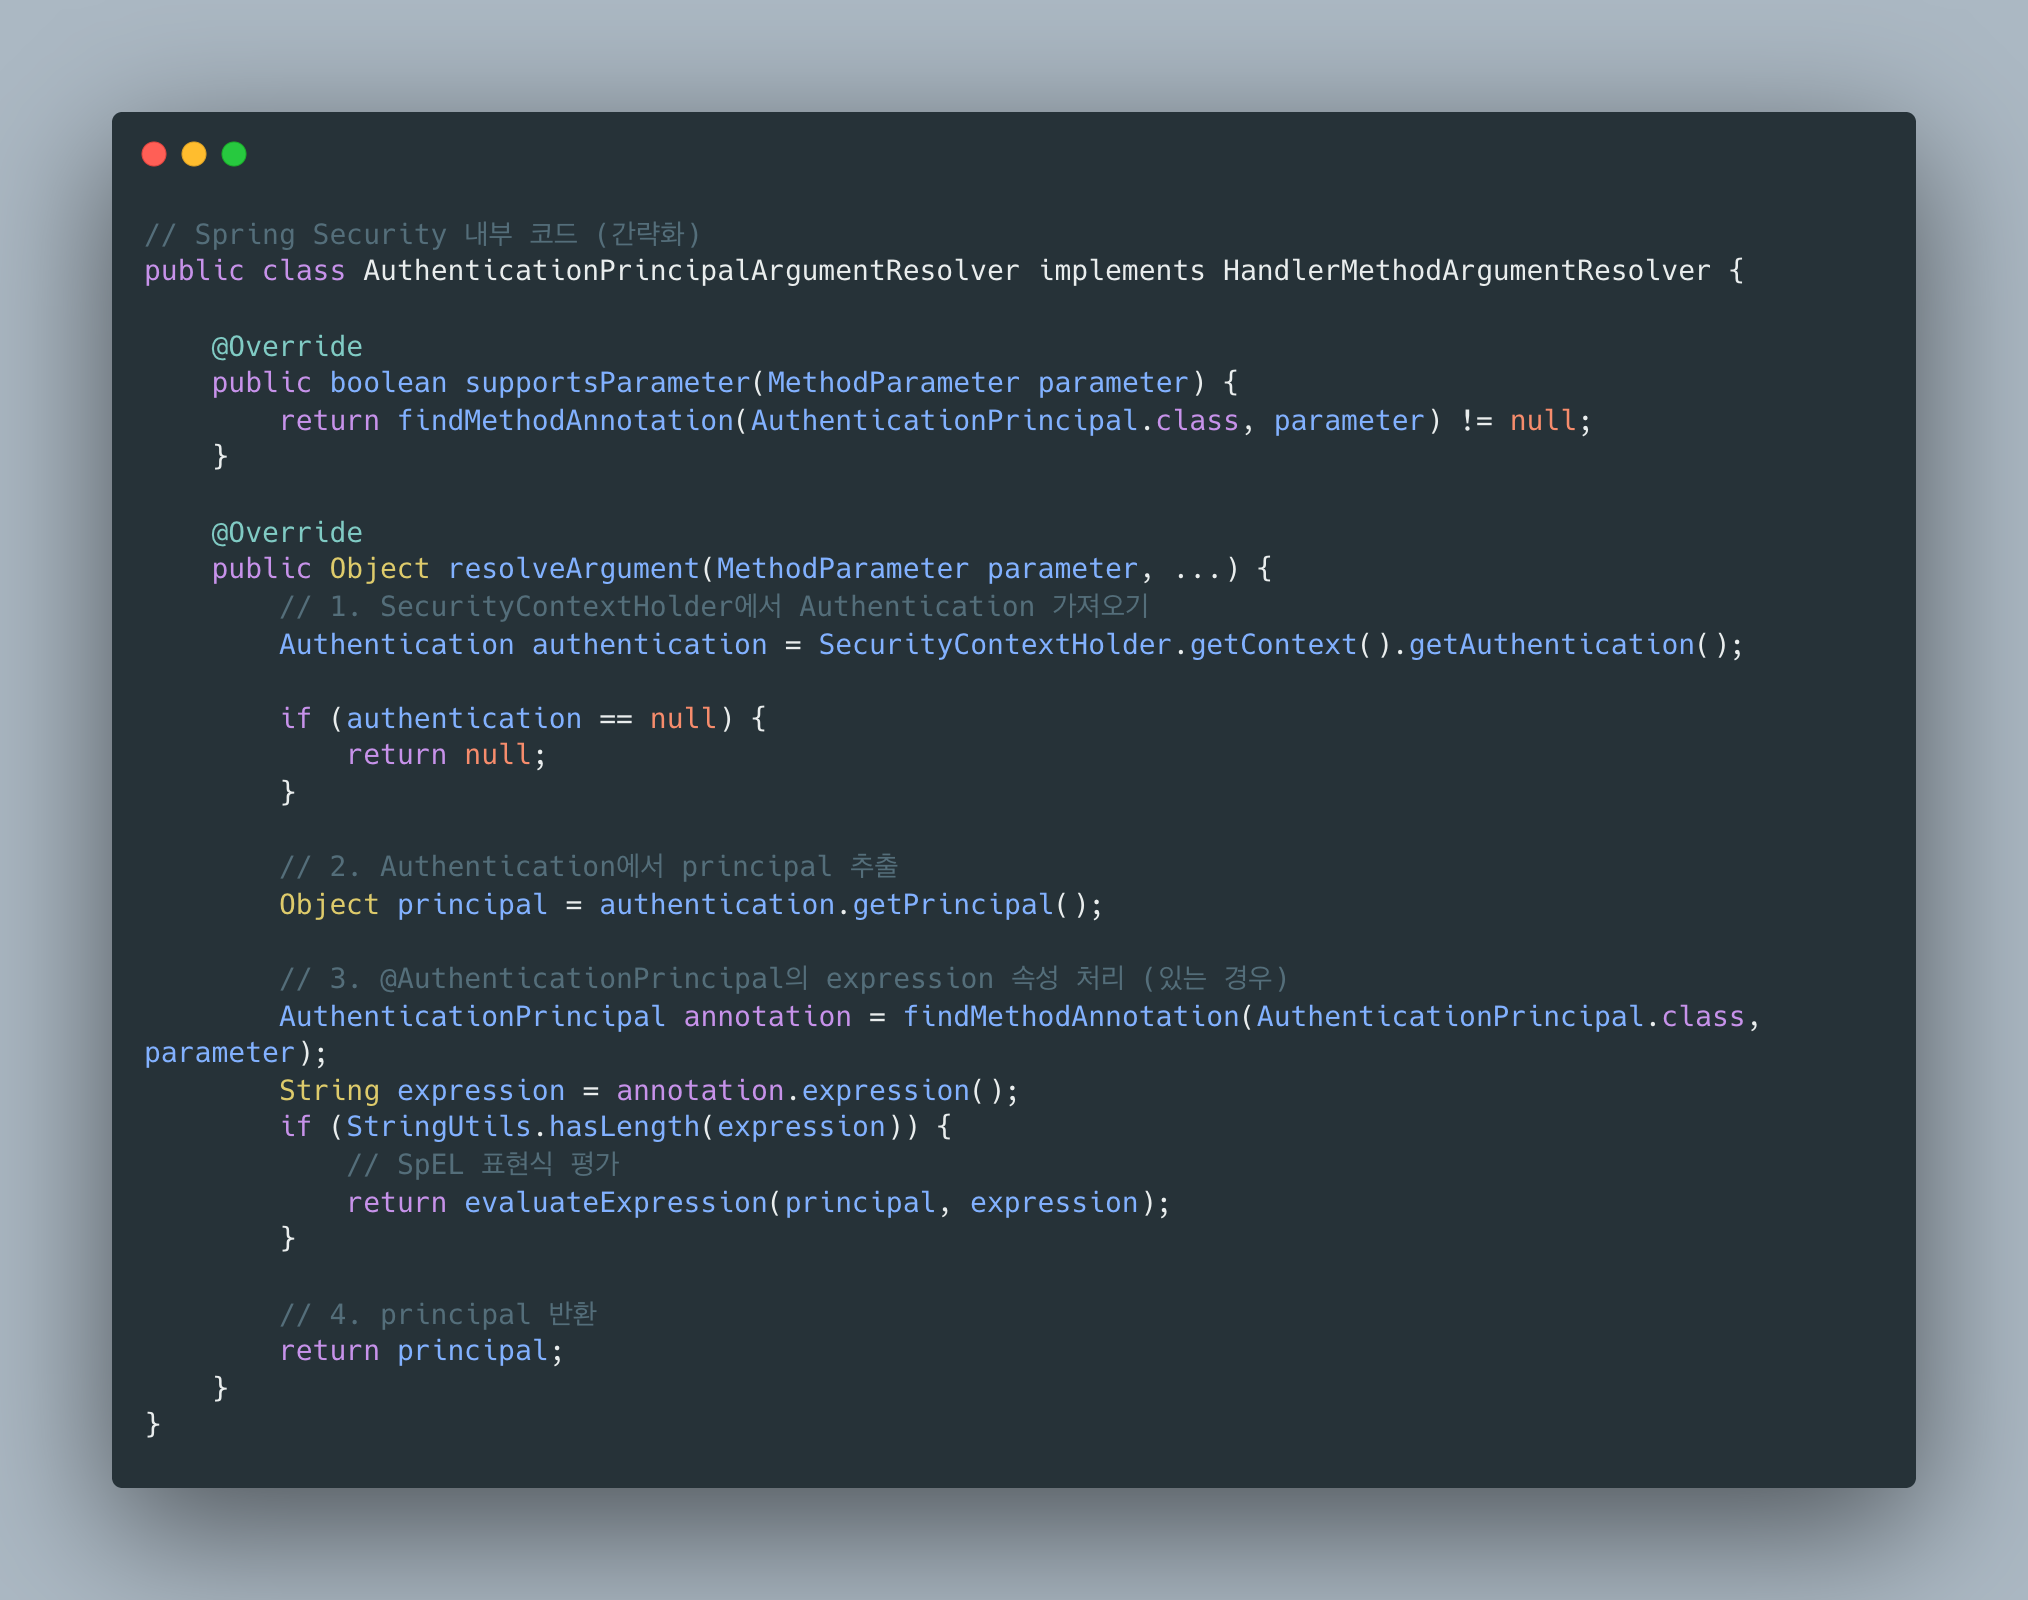
결국 내부적으로는 SecurityContextHolder.getContext().getAuthentication().getPrincipal()을 호출합니다. Spring이 이 과정을 자동으로 해주는 것뿐입니다.
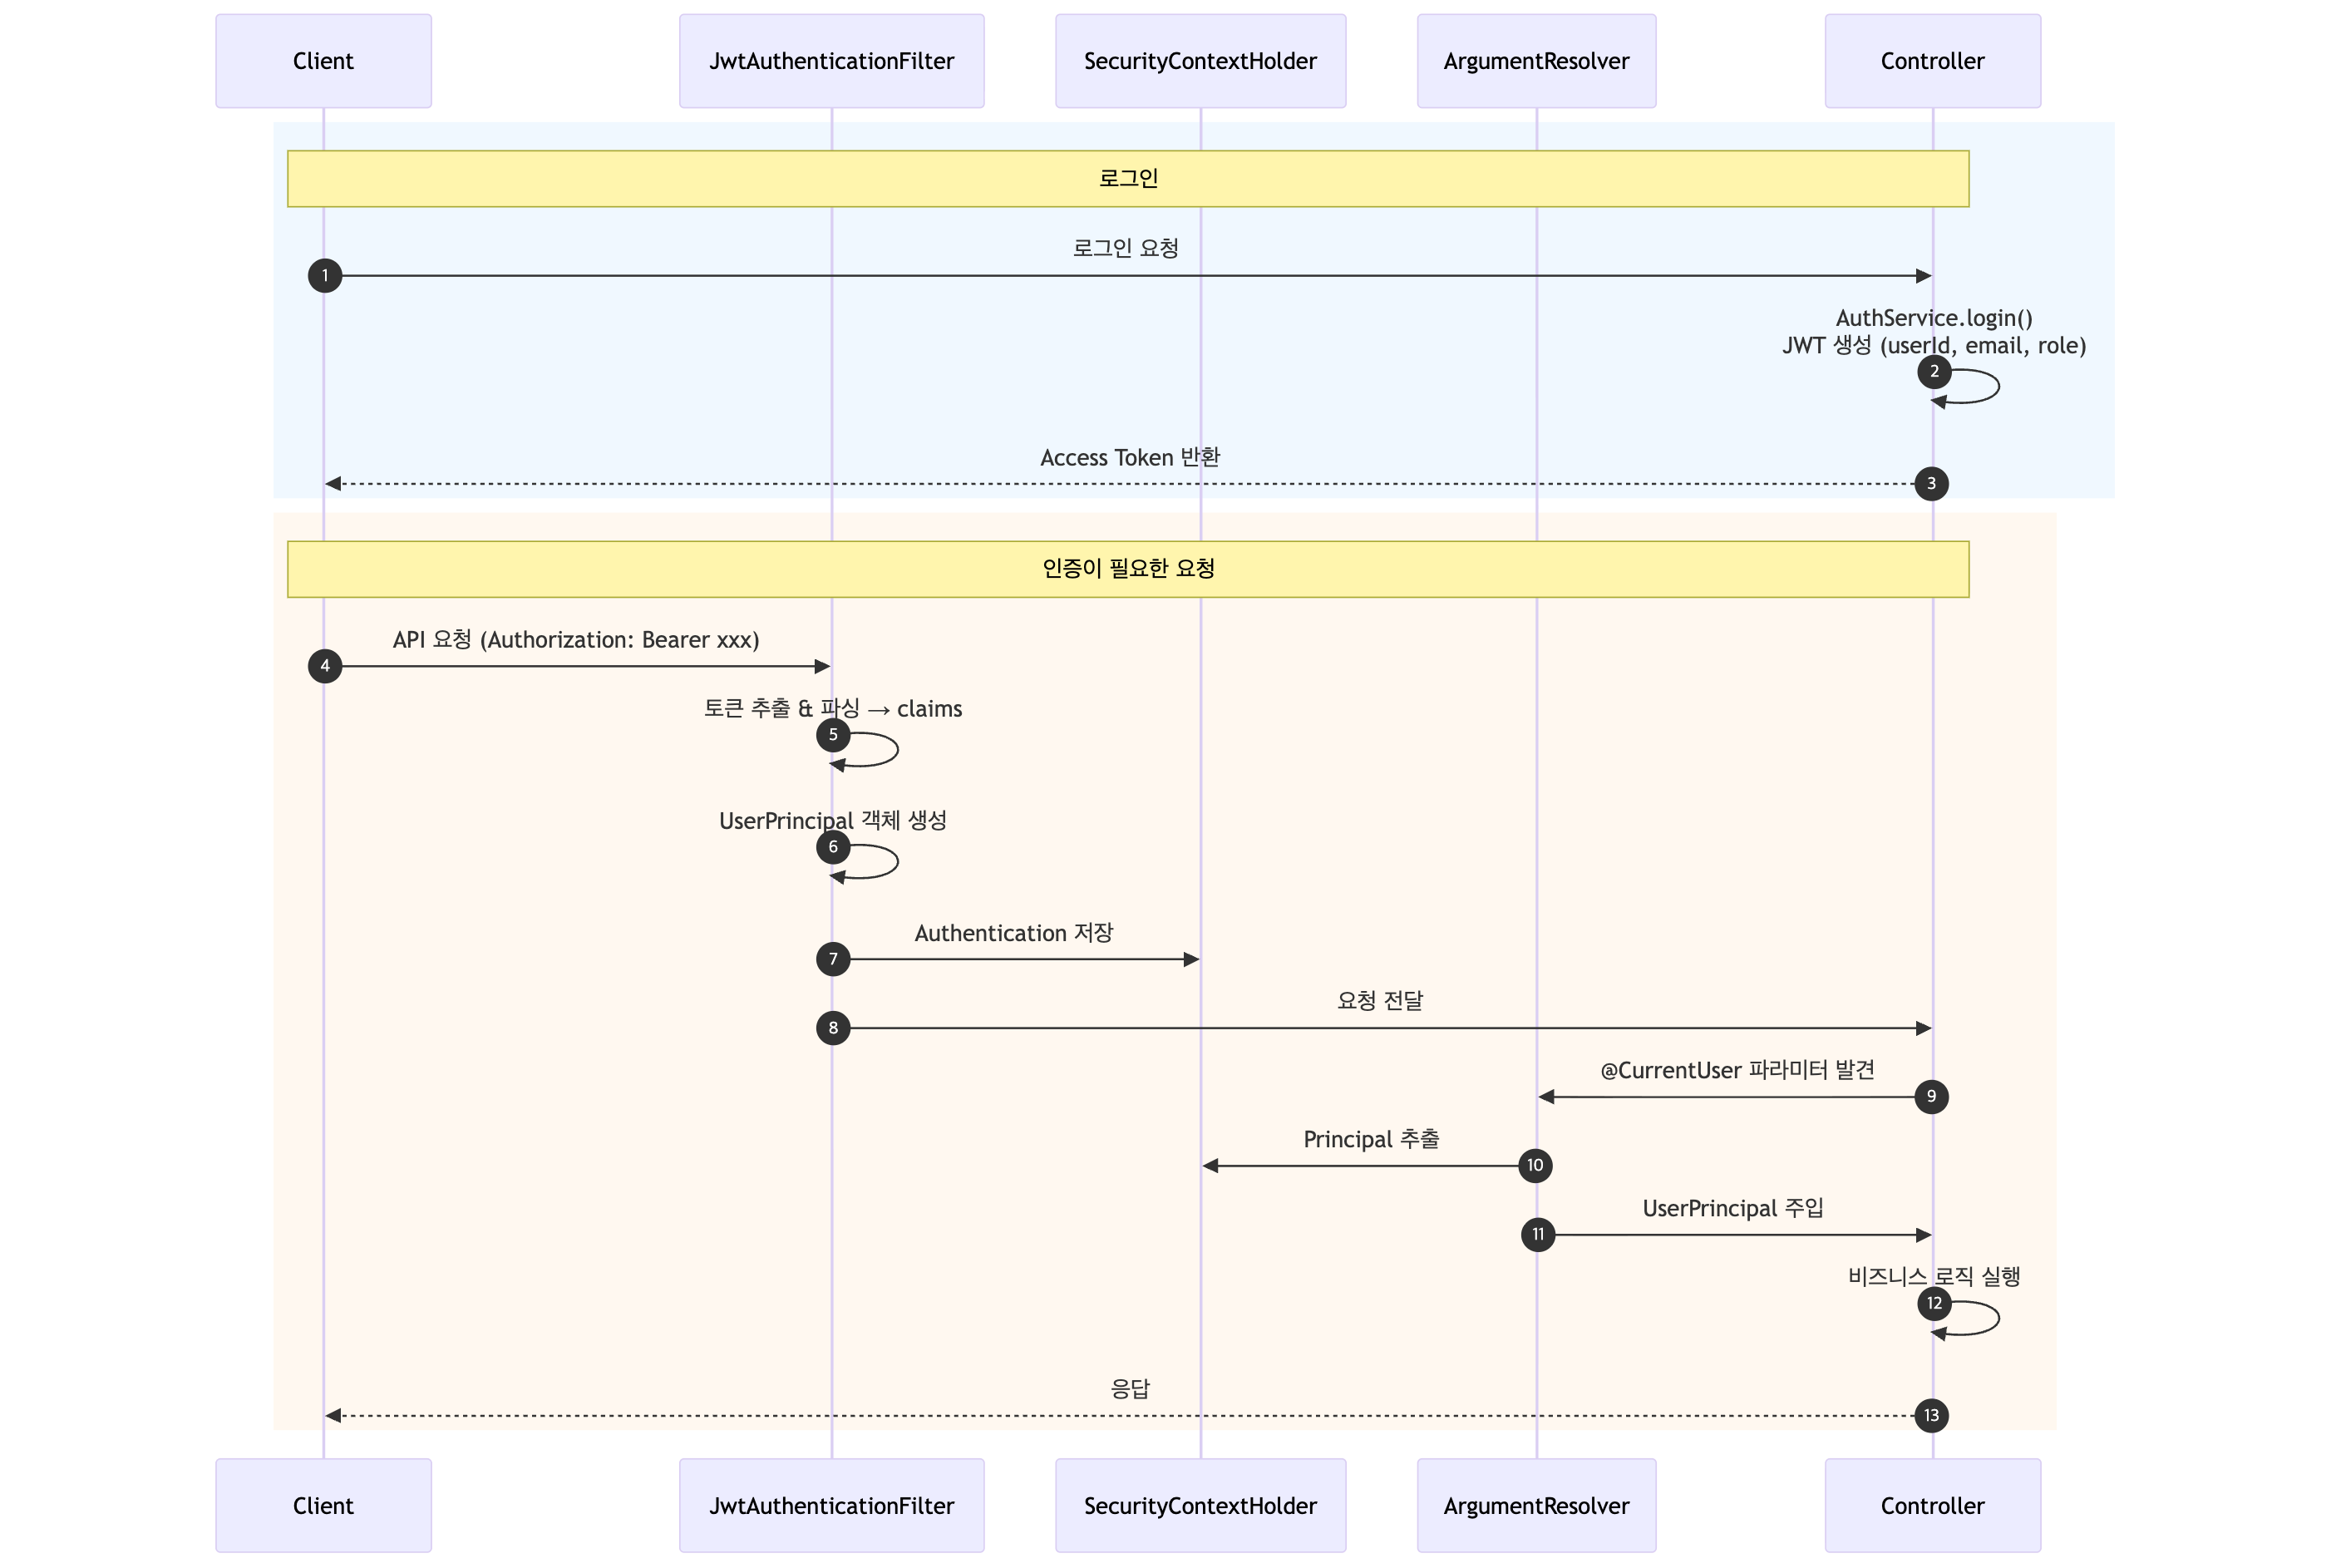
JWT 환경에서의 흐름
실제 구현 코드
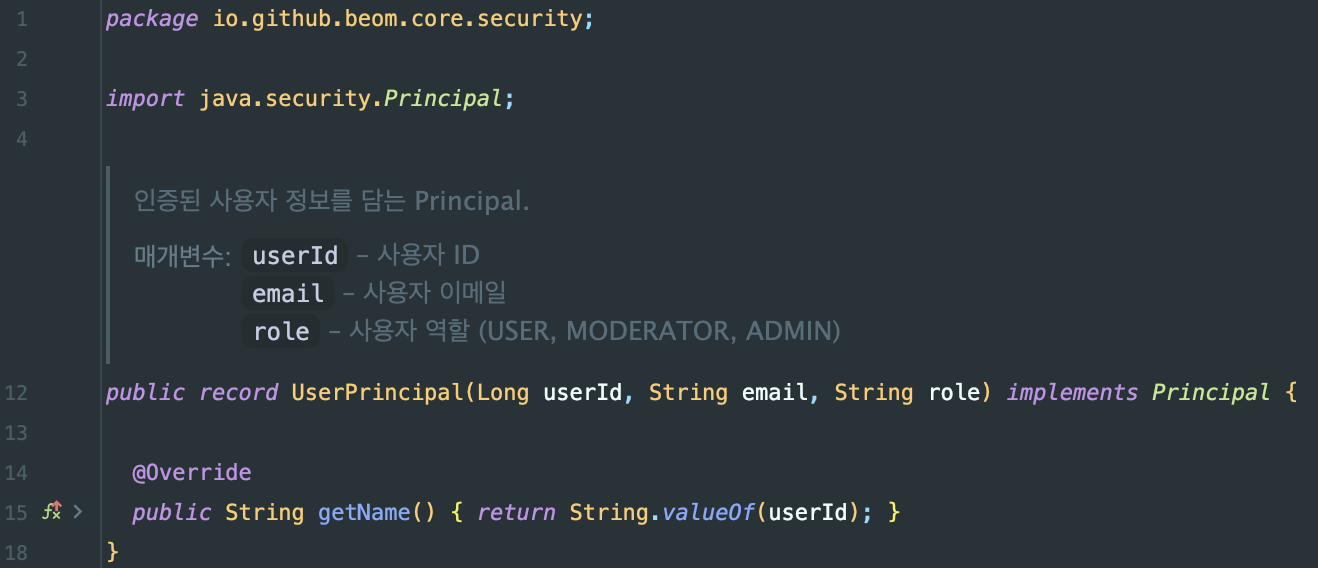
UserPrincipal
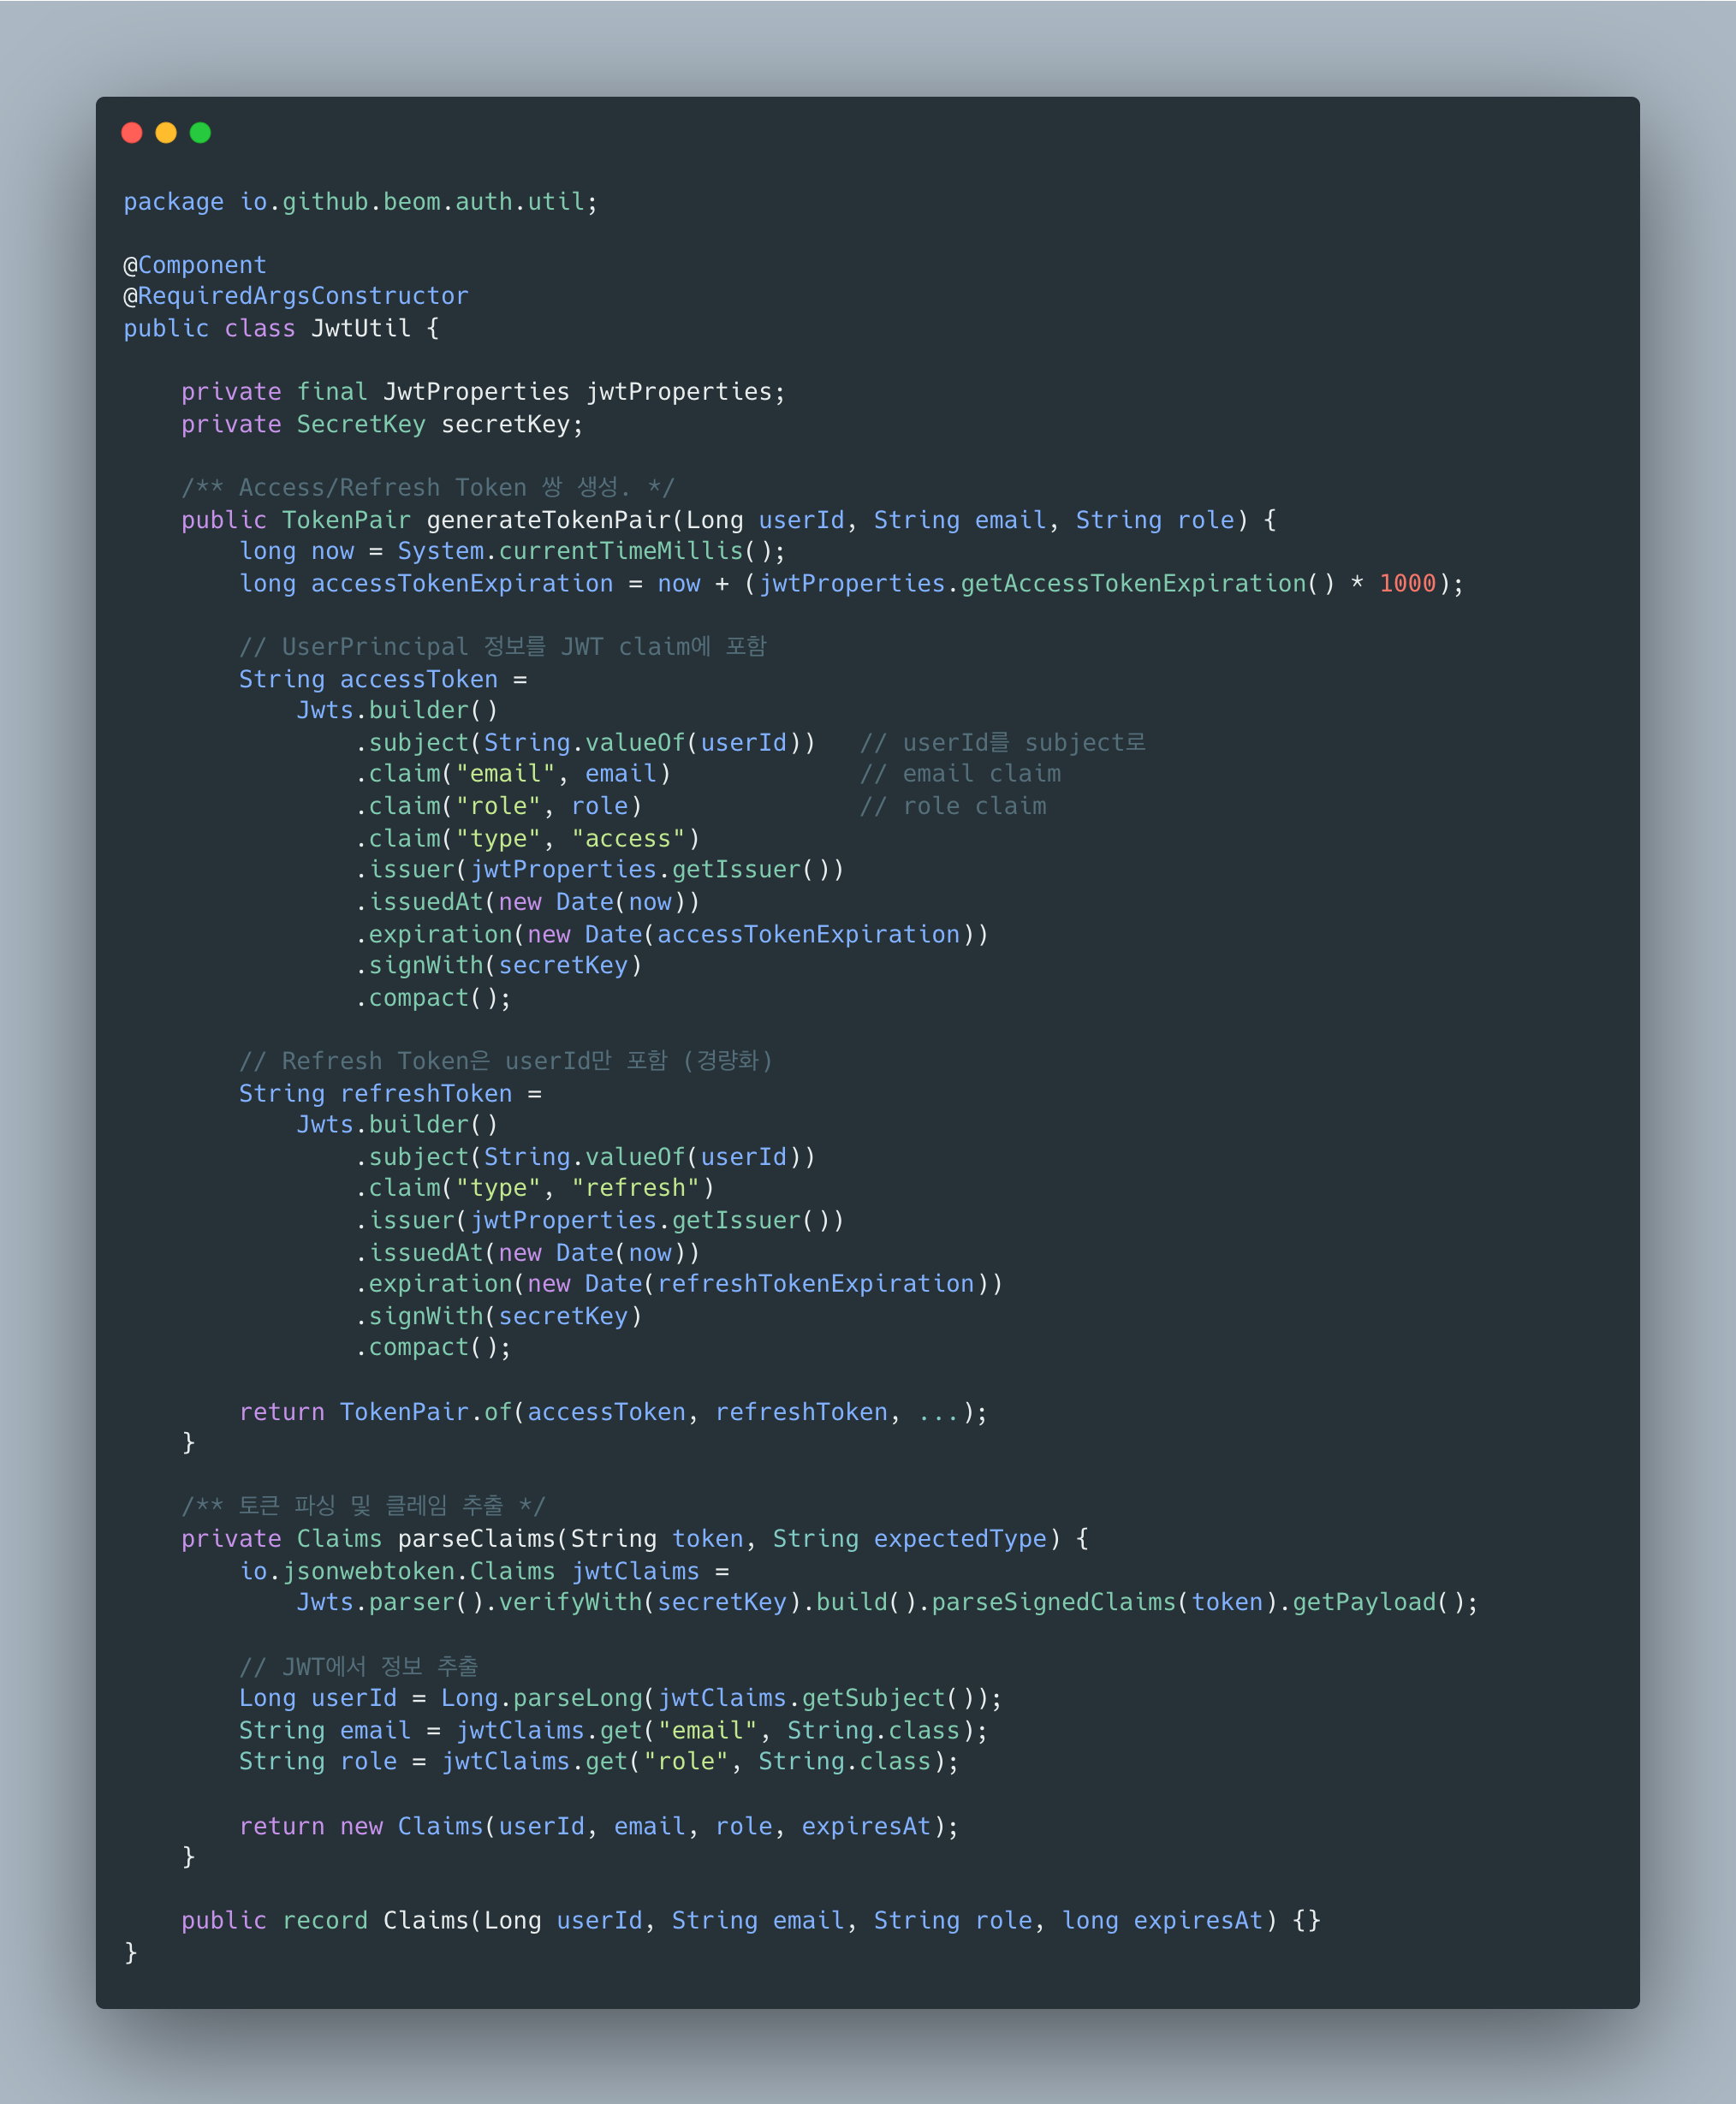
JwtUtil
JwtAuthenticationFilter
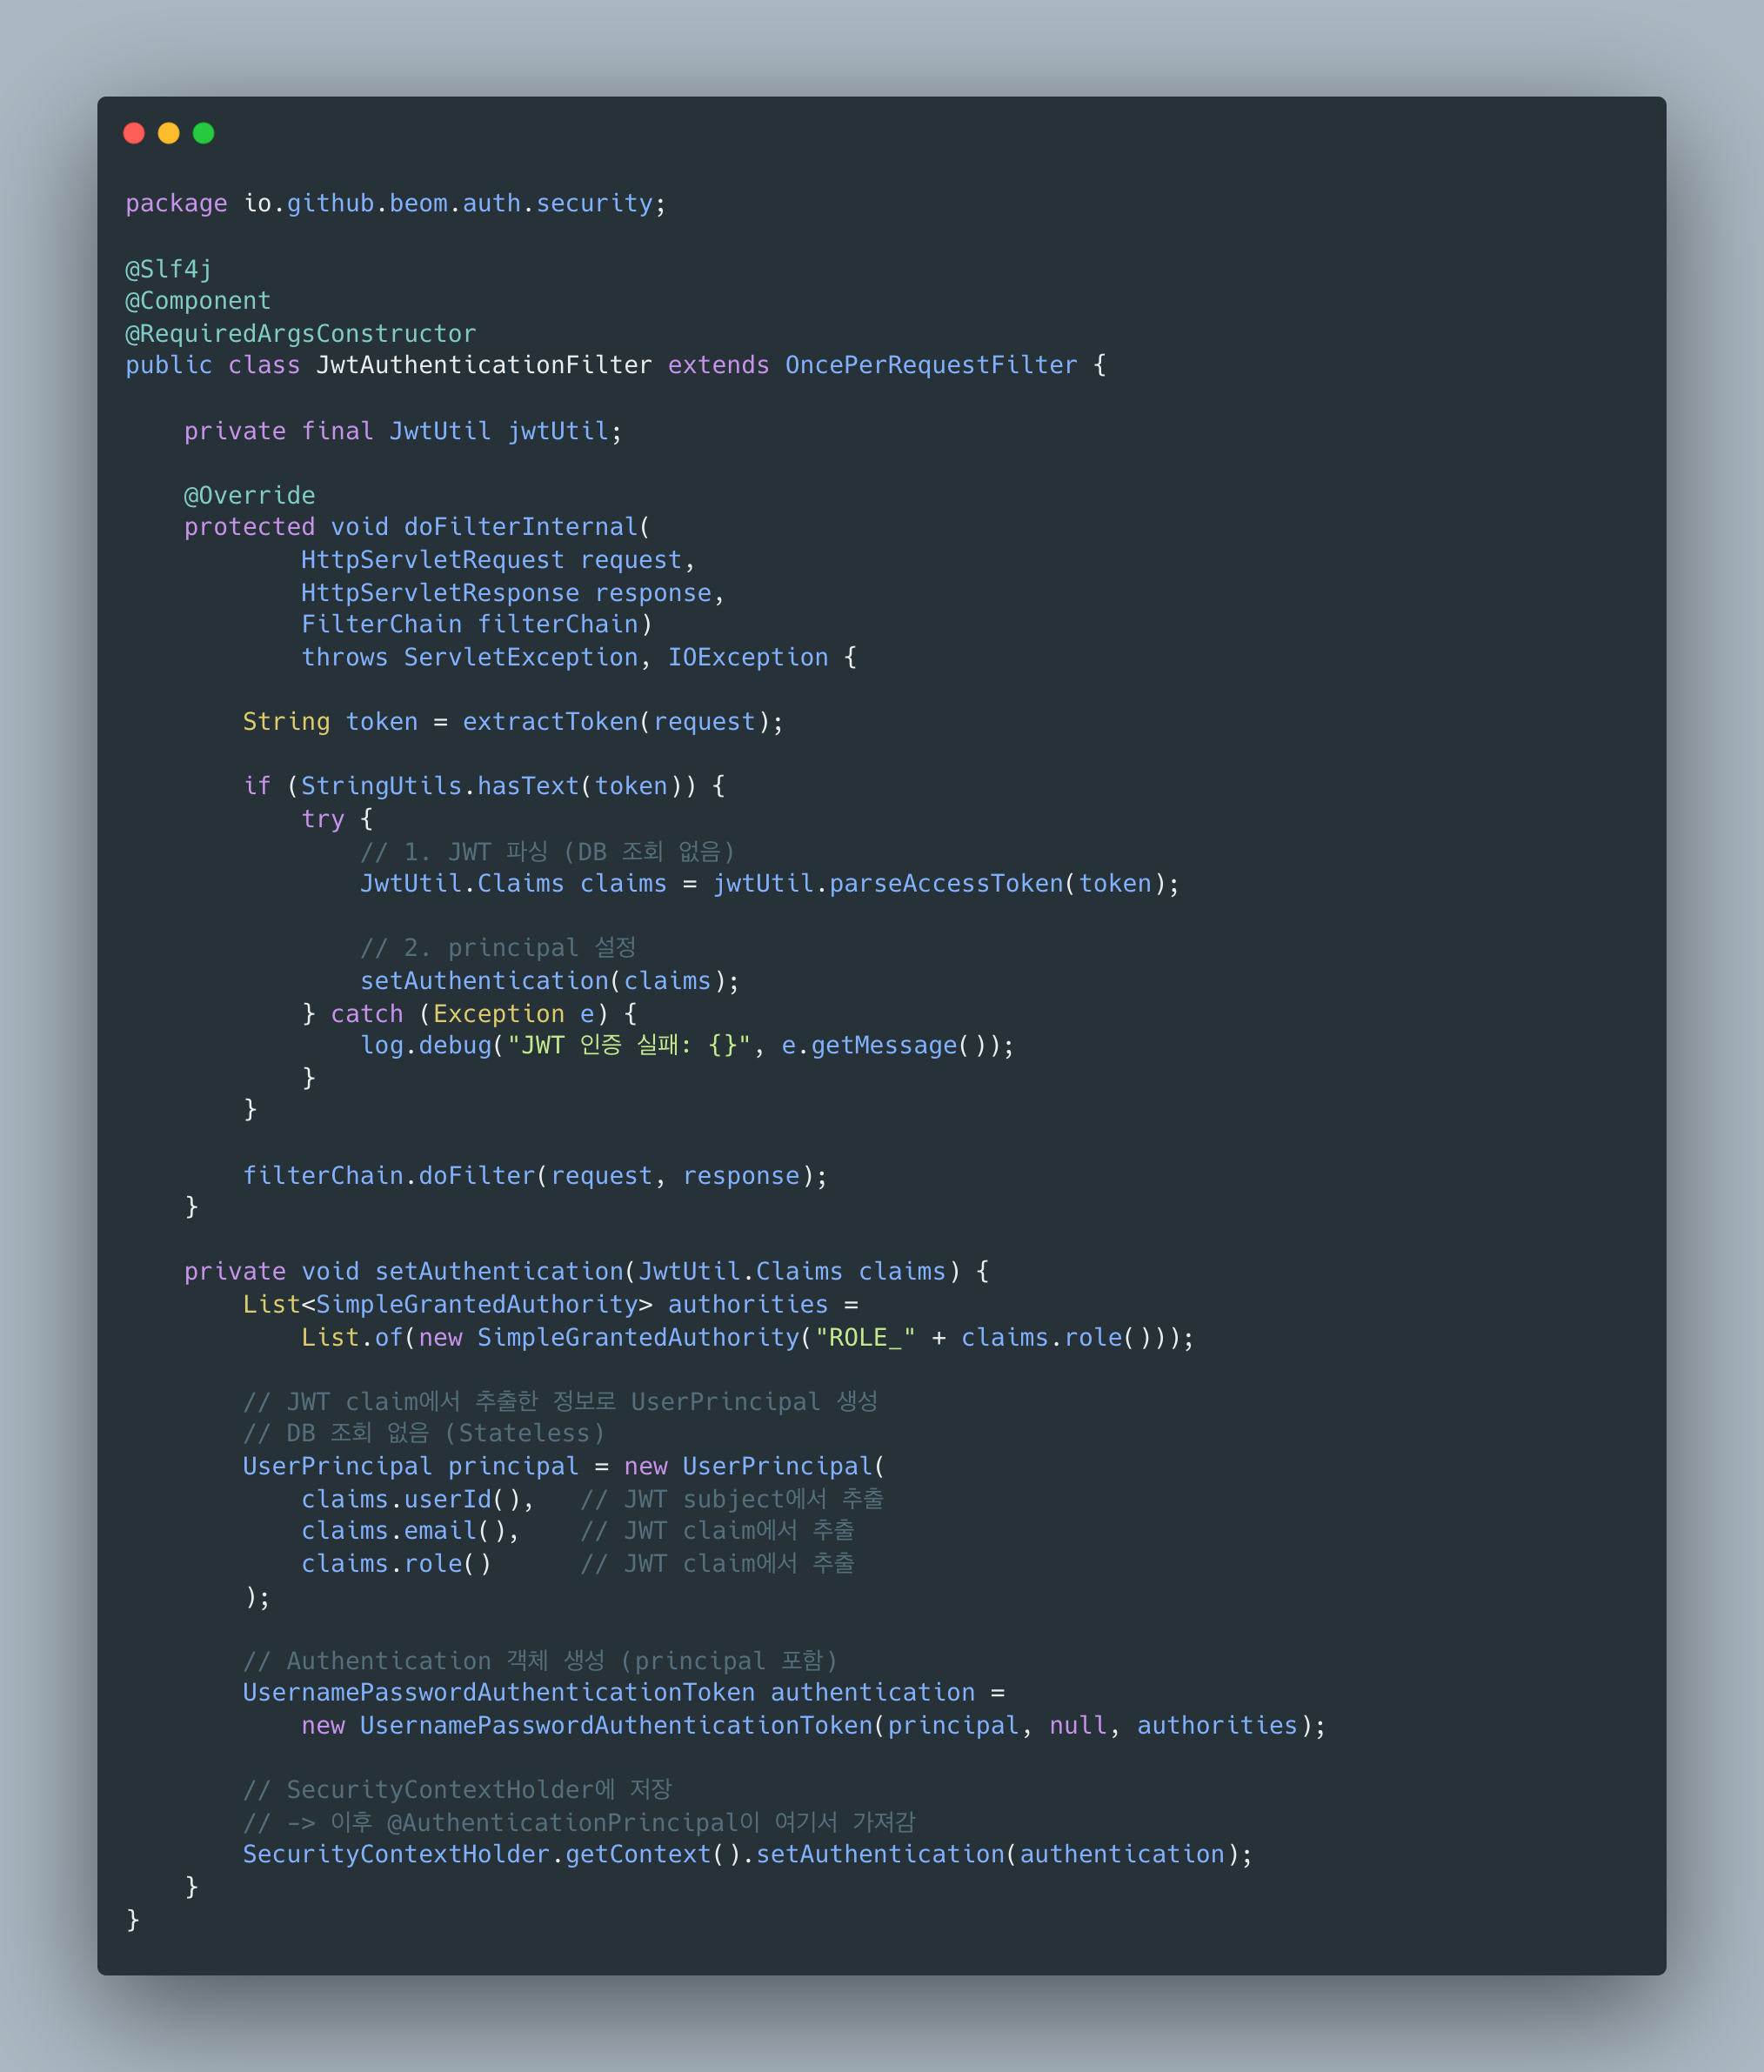
JWT 토큰에서 claim을 파싱해서 UserPrincipal을 만들고, SecurityContextHolder에 저장합니다. 여기서 DB 조회는 전혀 없습니다.
@CurrentUser 커스텀 어노테이션
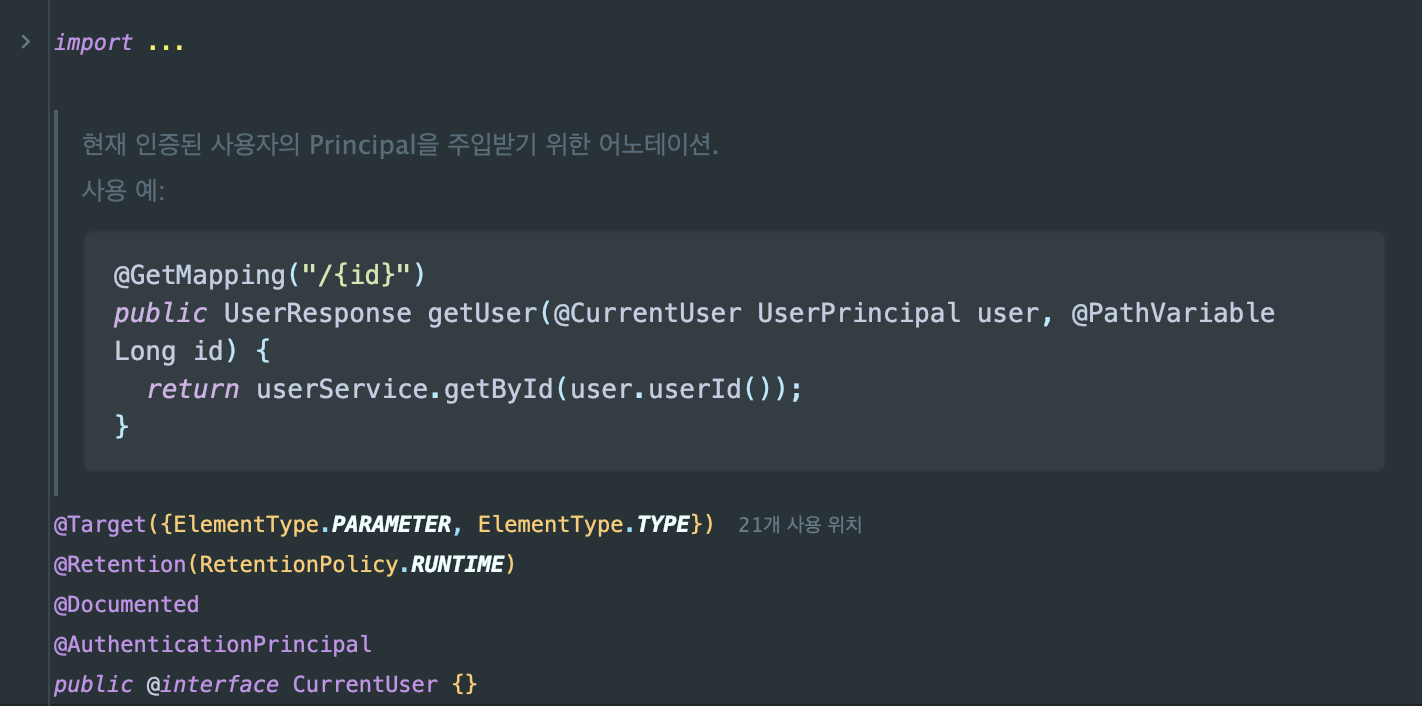
@AuthenticationPrincipal을 메타 어노테이션으로 감싸서 @CurrentUser를 만들었습니다.
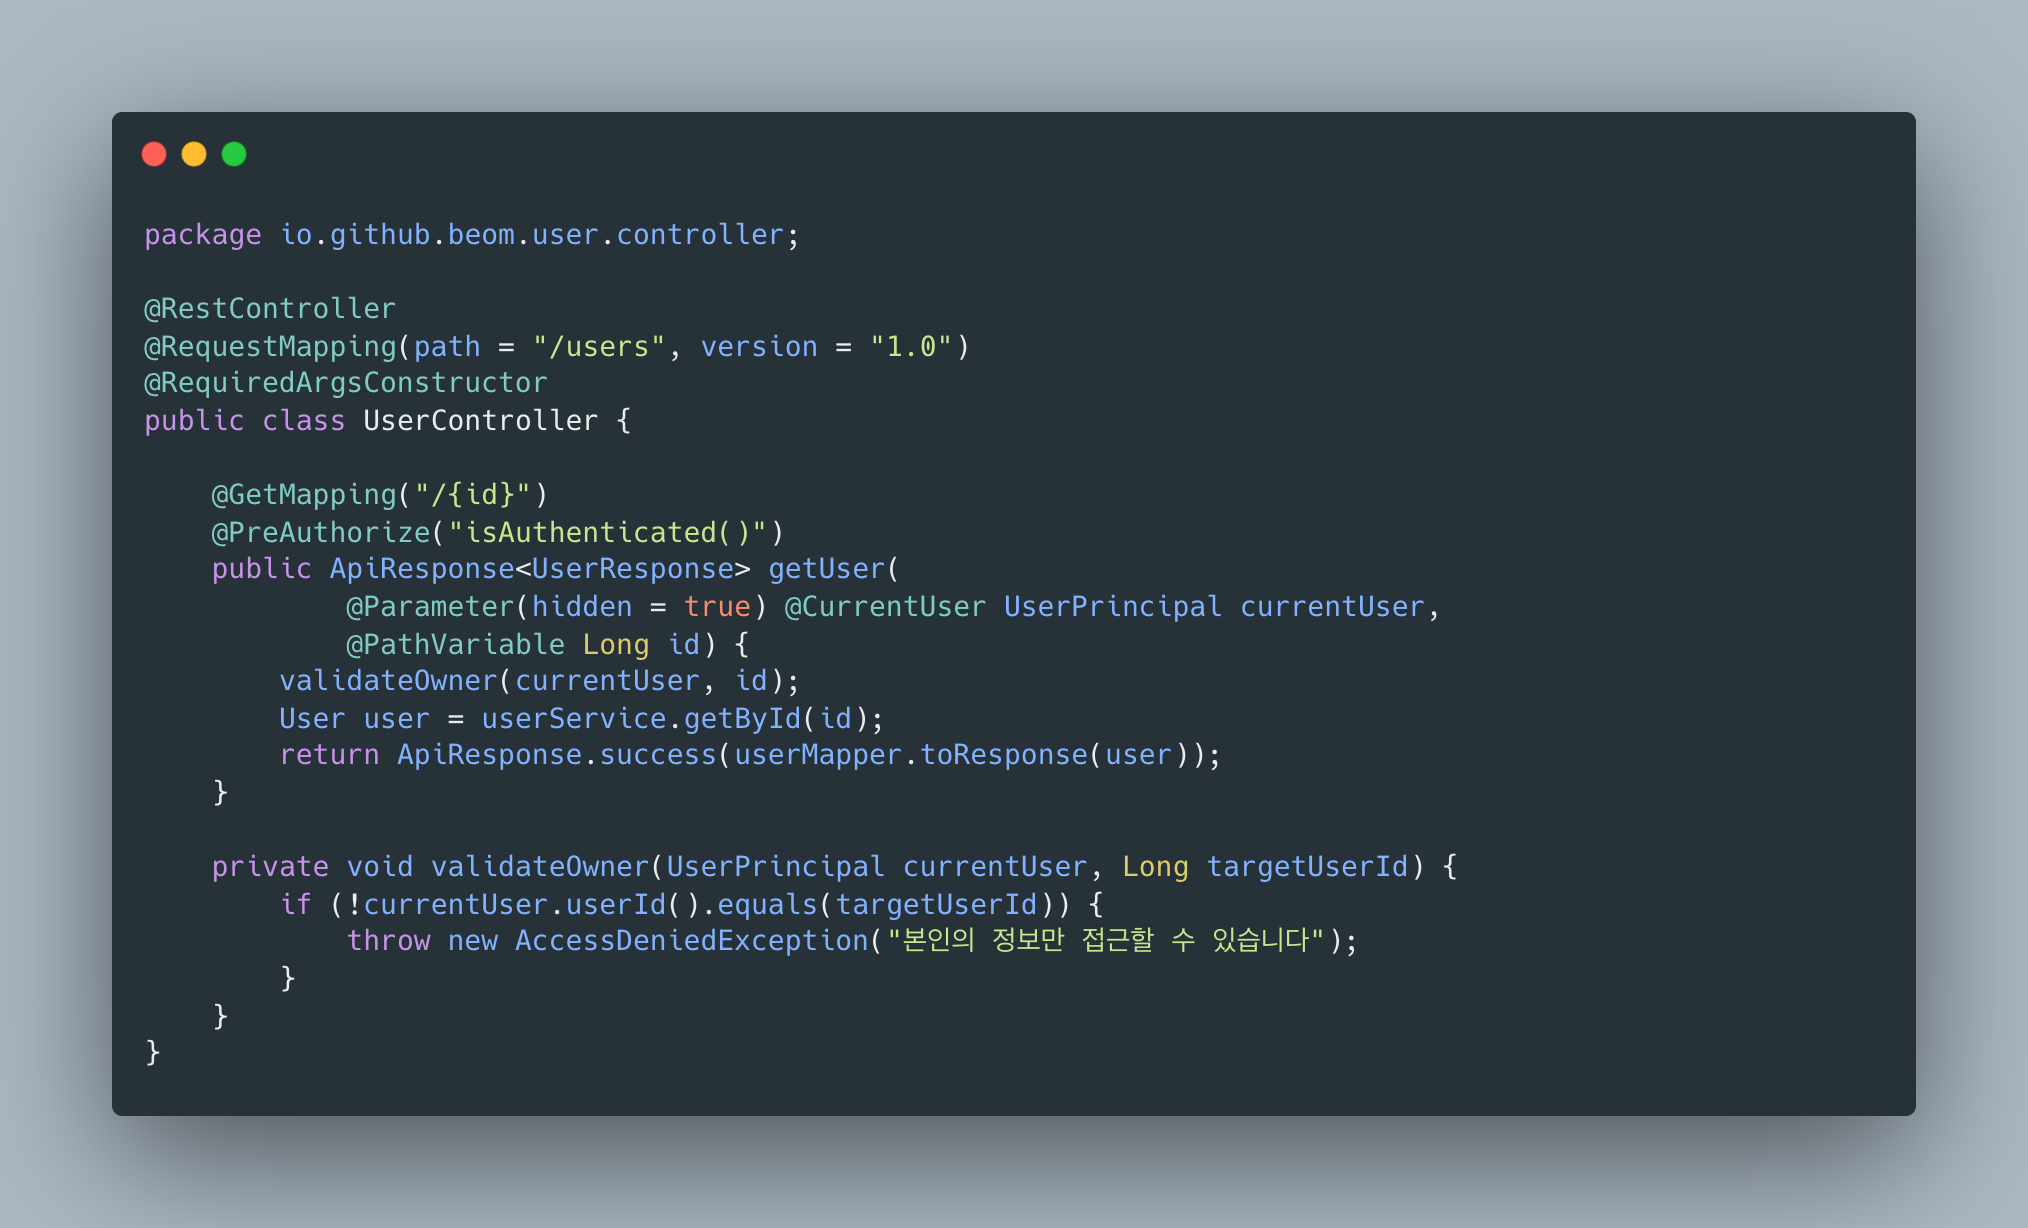
Controller에서 사용
근데 @CurrentUser를 왜 써?
셋 다 결국 SecurityContextHolder에서 principal을 가져오는 건 똑같습니다.
SecurityContextHolder.getContext().getAuthentication().getPrincipal();그럼 왜 굳이 커스텀 어노테이션을 만들었을까요. @AuthenticationPrincipal을 직접 쓰면 모든 컨트롤러에 Spring Security import가 들어갑니다. @CurrentUser로 감싸면 그 의존성이 어노테이션 파일 하나에만 집중됩니다. 나중에 Principal 구조가 바뀌어도 한 곳만 고치면 되니 편합니다.
Spring Security 공식 문서에서도 이 방식을 권장합니다.
“You can further remove your dependency on Spring Security by making
@AuthenticationPrincipala meta annotation on your own annotation.”
주의할 점: NPE
인증이 필요 없는 API에서 @CurrentUser를 쓰면 null이 들어옵니다.
@GetMapping("/public/info")public ApiResponse<Info> getPublicInfo( @CurrentUser UserPrincipal currentUser) { // 토큰 없이 요청하면 currentUser가 null Long userId = currentUser.userId(); // NPE!}해결법: @PreAuthorize랑 같이 쓰기
@GetMapping("/{id}")@PreAuthorize("isAuthenticated()") // 인증 안 되면 여기서 막힘public ApiResponse<UserResponse> getUser( @CurrentUser UserPrincipal currentUser, // null 아님 보장 @PathVariable Long id) { // ...}@PreAuthorize는 인증 안 된 요청을 차단하고, @CurrentUser는 principal을 주입해줍니다. 그래서 인증 필수 API에서는 둘 다 붙여주는 게 안전합니다.
선택적 인증이 필요하면?
로그인 안 해도 되는데 로그인하면 추가 정보를 보여주는 API가 있다면 (예: 인스타그램 게시글에서 비로그인은 그냥 보기, 로그인하면 좋아요 눌렀는지 표시), 커스텀 ArgumentResolver를 만들어서 null 처리를 해주면 됩니다.
지금 프로젝트는 모바일 앱 전용이라 거의 다 인증 필수라서 안 만들었습니다.
속도는?
JWT라서 DB 조회가 없습니다. 토큰 파싱은 CPU 연산만 수행하기 때문에 sub-millisecond 수준입니다. 세션 방식은 매 요청마다 DB나 Redis를 조회해야 해서 네트워크 I/O가 추가됩니다. Redis 조회는 보통 1ms 미만, DB 조회는 수 ms 수준입니다. 물론 세션도 장점이 있지만 (토큰 탈취 시 즉시 무효화 등), 모바일 앱에서는 멀티 디바이스 지원과 서버 무상태성이 중요해서 JWT가 더 맞습니다.
전체 흐름
[로그인]POST /auth/login -> AuthService.login() -> JwtUtil.generateTokenPair(userId, email, role) -> 클라이언트에 토큰 반환
[API 요청]GET /users/{id} (Authorization: Bearer {token}) -> JwtAuthenticationFilter -> 토큰 파싱 -> UserPrincipal 생성 -> SecurityContext에 저장 -> AuthenticationPrincipalArgumentResolver -> SecurityContext에서 principal 꺼내서 @CurrentUser에 주입 -> UserController.getUser() 실행정리
@AuthenticationPrincipal은 결국 SecurityContextHolder에서 가져오는 것이고, @CurrentUser로 감싸면 의존성 관리가 좀 더 깔끔해집니다. 인증 필수 API에서는 @PreAuthorize랑 같이 쓰면 NPE 걱정 없이 쓸 수 있습니다.
참고
- Spring Security - AuthenticationPrincipal
- Baeldung - Retrieve User Information in Spring Security
- @AuthenticationPrincipal 동작 원리 - Jian’s Tech Blog
While implementing JWT authentication with Spring Security, I had to figure out how to retrieve the logged-in user’s information in controllers. After comparing several approaches, I decided to create and use a @CurrentUser custom annotation. Here is a summary of that process.
Ways to Retrieve the Logged-In Object
1. Directly from SecurityContextHolder
This is the most primitive approach. You have to write this code every time, which is tedious. You also have to handle null checks yourself, and writing tests becomes cumbersome.
2. Receiving Principal as a Controller Parameter
Principal is a Java standard interface that only has getName(). You cannot access custom information like userId or role, which limits its practicality.
3. Using @AuthenticationPrincipal
This approach has been available since Spring Security 3.2. It lets you inject a custom principal object directly, making it the most convenient option.
How Does @AuthenticationPrincipal Work?
AuthenticationPrincipalArgumentResolver
Under the hood, it calls SecurityContextHolder.getContext().getAuthentication().getPrincipal(). Spring simply automates this process for you.
Flow in a JWT Environment
Actual Implementation Code
UserPrincipal
JwtUtil
JwtAuthenticationFilter
It parses the claims from the JWT token, creates a UserPrincipal, and stores it in the SecurityContextHolder. There is no DB lookup involved here at all.
@CurrentUser Custom Annotation
I wrapped @AuthenticationPrincipal as a meta-annotation to create @CurrentUser.
Usage in Controller
But Why Use @CurrentUser?
All three approaches ultimately do the same thing — they retrieve the principal from SecurityContextHolder.
SecurityContextHolder.getContext().getAuthentication().getPrincipal();So why bother creating a custom annotation? If you use @AuthenticationPrincipal directly, every controller ends up with a Spring Security import. By wrapping it with @CurrentUser, that dependency is concentrated in a single annotation file. If the Principal structure changes later, you only need to modify one place.
The Spring Security official documentation also recommends this approach:
“You can further remove your dependency on Spring Security by making
@AuthenticationPrincipala meta annotation on your own annotation.”
Watch Out: NPE
If you use @CurrentUser on an API that does not require authentication, null gets injected.
@GetMapping("/public/info")public ApiResponse<Info> getPublicInfo( @CurrentUser UserPrincipal currentUser) { // If requested without a token, currentUser is null Long userId = currentUser.userId(); // NPE!}Solution: Use It Together with @PreAuthorize
@GetMapping("/{id}")@PreAuthorize("isAuthenticated()") // Blocks unauthenticated requests herepublic ApiResponse<UserResponse> getUser( @CurrentUser UserPrincipal currentUser, // Guaranteed non-null @PathVariable Long id) { // ...}@PreAuthorize blocks unauthenticated requests, and @CurrentUser injects the principal. So for APIs that require authentication, using both is the safe approach.
What If Optional Authentication Is Needed?
If there is an API where login is optional but logged-in users see extra information (e.g., an Instagram post — non-logged-in users can just view it, logged-in users see whether they liked it), you can create a custom ArgumentResolver to handle the null case.
In this project, since it is a mobile-app-only API where almost everything requires authentication, I did not build one.
Performance?
Since it uses JWT, there is no DB lookup. Token parsing only performs CPU operations, so it completes in sub-millisecond time. Session-based approaches require a DB or Redis lookup on every request, adding network I/O. Redis lookups are typically under 1ms, while DB lookups take several milliseconds. Sessions do have their advantages (like immediate token revocation upon theft), but for a mobile app, multi-device support and server statelessness are important, making JWT the better fit.
End-to-End Flow
[Login]POST /auth/login -> AuthService.login() -> JwtUtil.generateTokenPair(userId, email, role) -> Return token to client
[API Request]GET /users/{id} (Authorization: Bearer {token}) -> JwtAuthenticationFilter -> Parse token -> Create UserPrincipal -> Store in SecurityContext -> AuthenticationPrincipalArgumentResolver -> Extract principal from SecurityContext and inject into @CurrentUser -> UserController.getUser() executesSummary
@AuthenticationPrincipal ultimately retrieves the principal from SecurityContextHolder, and wrapping it with @CurrentUser makes dependency management cleaner. For APIs that require authentication, combining it with @PreAuthorize eliminates NPE concerns.
References

댓글
댓글 수정/삭제는 GitHub Discussions에서 가능합니다.