Java 동시성 컬렉션과 유틸리티
목차
들어가며
멀티스레드 환경에서 일반 컬렉션(ArrayList, HashMap)을 사용하면 경쟁 조건(Race Condition)이 발생합니다. synchronized로 모든 메서드를 감싸는 Vector나 Hashtable은 성능이 떨어집니다.
Java는 java.util.concurrent 패키지에서 고성능 동시성 컬렉션을 제공합니다. 이 문서에서는 실무에서 자주 사용되는 동시성 자료구조와 락 메커니즘을 다루겠습니다.
1. ConcurrentHashMap
1.1 문제: HashMap의 동시성 이슈
// 일반 HashMap: 멀티스레드 환경에서 안전하지 않음Map<String, Integer> map = new HashMap<>();
// 스레드 1map.put("count", 1);
// 스레드 2 (동시 실행)map.put("count", 2); // Race Condition!
// 최악의 경우 내부 구조가 깨져서 무한 루프 발생 가능 (Java 7 이전)Hashtable의 문제:
// Hashtable: 모든 메서드가 synchronizedHashtable<String, Integer> table = new Hashtable<>();
// 문제: 모든 연산이 전체 테이블을 잠금table.put("key1", 1); // 전체 락table.get("key2"); // 읽기도 전체 락 (비효율적!)1.2 ConcurrentHashMap의 해결책: 세그먼트 락 (Java 8 이전)
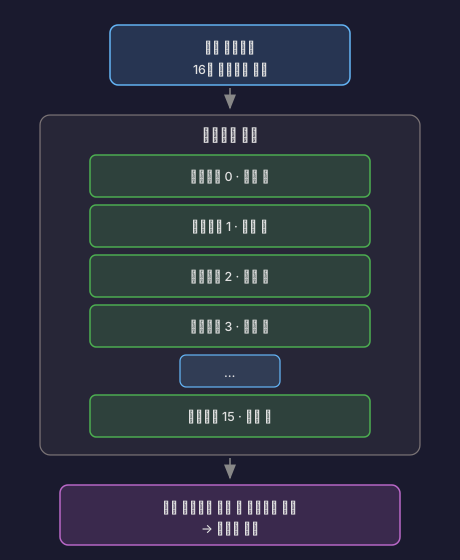
Java 7까지는 세그먼트(Segment) 락을 사용했습니다.
// 개념적 구조 (실제 코드는 아님)class ConcurrentHashMap<K, V> { Segment<K, V>[] segments = new Segment[16]; // 기본 16개 세그먼트
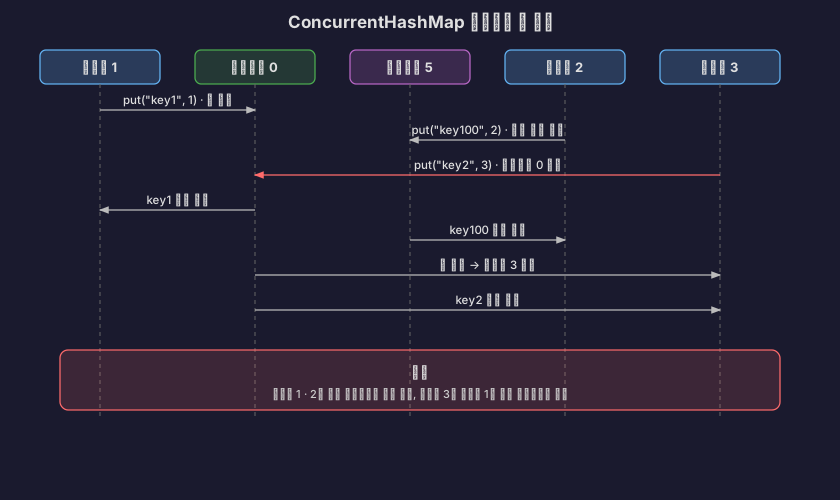
static class Segment<K, V> { ReentrantLock lock = new ReentrantLock(); HashEntry<K, V>[] table; }}동작 방식:
예시:
1.3 ConcurrentHashMap의 개선: CAS 기반 (Java 8 이후)
세그먼트 수가 생성 시 고정되어 동시성 수준이 제한되고, 메모리 오버헤드가 컸기 때문에 Java 8에서 CAS 기반으로 전환했다.
Java 8부터는 세그먼트를 제거하고 CAS(Compare-And-Swap) + synchronized를 사용합니다.
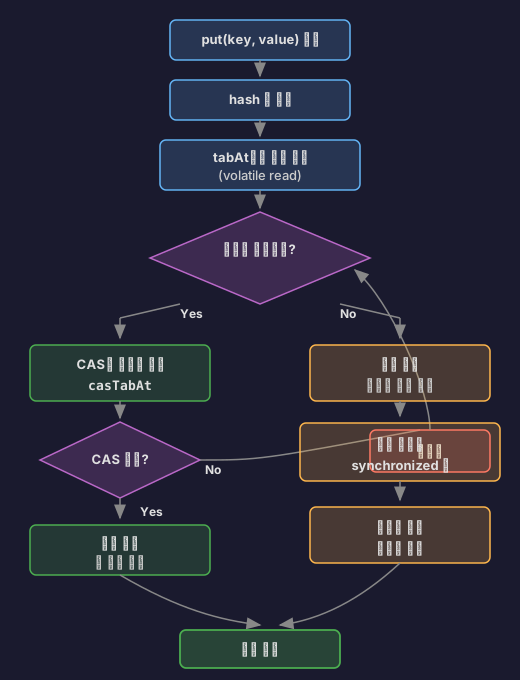
// 간소화된 put 구조public V put(K key, V value) { int hash = hash(key);
for (Node<K,V>[] tab = table;;) { Node<K,V> f = tabAt(tab, i); // volatile read
if (f == null) { // 빈 버킷: CAS로 원자적 삽입 if (casTabAt(tab, i, null, new Node<K,V>(hash, key, value))) { break; // 성공! } } else { // 충돌 발생: 해당 버킷만 synchronized synchronized (f) { // 버킷 내에서만 락 (매우 세밀한 락) // 체이닝 또는 트리에 삽입 } } }}핵심 아이디어:
- 빈 버킷: CAS로 락 없이 삽입 (빠름)
- 충돌 버킷: 해당 버킷 헤드 노드만 락 (세그먼트보다 세밀)
- 읽기: volatile read로 락 없이 수행
성능 비교:
// Hashtable: 전체 락 (최악)synchronized (전체 테이블) { // 모든 연산}
// ConcurrentHashMap (Java 7): 세그먼트 락 (중간)// 실제로는 ReentrantLock을 상속한 Segment를 사용segments[i].lock();try { // 해당 세그먼트만} finally { segments[i].unlock();}
// ConcurrentHashMap (Java 8+): 버킷 락 (최고)synchronized (bucket[i]) { // 해당 버킷만}1.4 실무 사용 예제
import java.util.concurrent.ConcurrentHashMap;
// 사용자 세션 관리public class SessionManager { private ConcurrentHashMap<String, UserSession> sessions = new ConcurrentHashMap<>();
public void createSession(String sessionId, UserSession session) { // putIfAbsent: 없을 때만 삽입 (원자적) UserSession existing = sessions.putIfAbsent(sessionId, session); if (existing != null) { throw new IllegalStateException("Session already exists"); } }
public void updateLastAccessTime(String sessionId) { // compute: 키의 값을 원자적으로 계산 sessions.computeIfPresent(sessionId, (id, session) -> { session.setLastAccessTime(System.currentTimeMillis()); return session; }); }
public void removeExpiredSessions() { long now = System.currentTimeMillis(); long timeout = 30 * 60 * 1000; // 30분
// 스레드 안전하게 순회하면서 삭제 sessions.entrySet().removeIf(entry -> now - entry.getValue().getLastAccessTime() > timeout ); }}
// 카운터 (원자적 증가)public class UrlClickCounter { private ConcurrentHashMap<String, Long> clicks = new ConcurrentHashMap<>();
public void recordClick(String url) { // merge: 키가 있으면 함수 적용, 없으면 초기값 삽입 clicks.merge(url, 1L, (oldValue, one) -> oldValue + 1);
// 또는 compute 사용 // clicks.compute(url, (k, v) -> (v == null) ? 1L : v + 1); }
public long getClicks(String url) { return clicks.getOrDefault(url, 0L); }}주의사항:
ConcurrentHashMap<String, List<String>> map = new ConcurrentHashMap<>();
// 잘못된 코드: 경쟁 조건 발생!if (!map.containsKey("users")) { map.put("users", new ArrayList<>()); // 사이에 다른 스레드가 끼어들 수 있음}map.get("users").add("Alice");
// 올바른 코드: 원자적 연산 사용map.computeIfAbsent("users", k -> new ArrayList<>()).add("Alice");// 주의: 반환된 ArrayList 자체는 thread-safe하지 않으므로,// 동시 수정이 필요하면 CopyOnWriteArrayList 등을 사용해야 한다출처: Java Documentation - ConcurrentHashMap, Baeldung - Guide to ConcurrentHashMap
2. CopyOnWriteArrayList
2.1 개념: 쓰기 시 복사
읽기가 압도적으로 많고 쓰기가 드문 경우에 사용합니다.
import java.util.concurrent.CopyOnWriteArrayList;
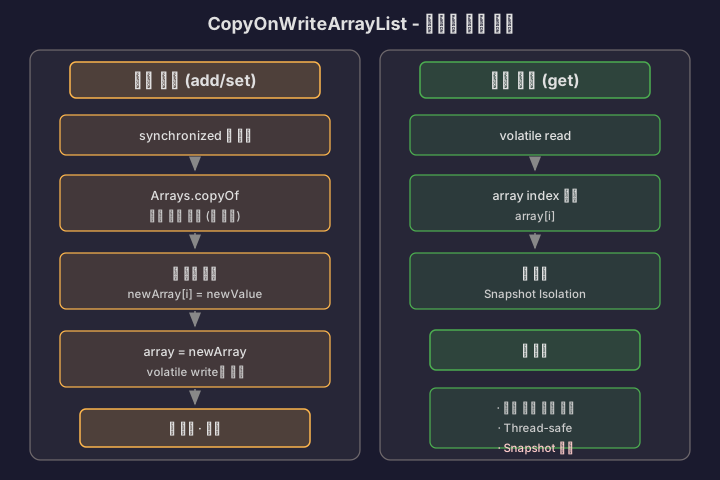
public class CopyOnWriteArrayList<E> { private volatile Object[] array;
public boolean add(E e) { synchronized (lock) { Object[] oldArray = array; int len = oldArray.length;
// 배열 전체를 복사 (비용이 큼!) Object[] newArray = Arrays.copyOf(oldArray, len + 1); newArray[len] = e;
// volatile write로 배열 교체 array = newArray; } return true; }
public E get(int index) { // 락 없음! volatile read만 return (E) array[index]; }}동작 원리:
2.2 사용 사례
// 이벤트 리스너 관리 (전형적인 사용 사례)public class EventBus { private CopyOnWriteArrayList<EventListener> listeners = new CopyOnWriteArrayList<>();
// 리스너 등록: 드물게 발생 public void addListener(EventListener listener) { listeners.add(listener); // 배열 복사 발생 }
// 이벤트 발생: 매우 자주 발생 public void publishEvent(Event event) { // 락 없이 빠르게 순회 for (EventListener listener : listeners) { listener.onEvent(event); } }}
// 설정 관리public class ConfigurationManager { private CopyOnWriteArrayList<String> allowedIps = new CopyOnWriteArrayList<>();
// 설정 변경: 드물게 발생 (관리자가 수동으로) public void addAllowedIp(String ip) { allowedIps.add(ip); }
// IP 검증: 매 요청마다 발생 (매우 빈번) public boolean isAllowed(String ip) { return allowedIps.contains(ip); // 락 없이 빠르게 확인 }}2.3 장단점
장점:
- 읽기가 완전히 락 프리 (매우 빠름)
- Iterator가
ConcurrentModificationException을 던지지 않음 - 스냅샷 격리 (읽는 동안 일관된 뷰 보장)
단점:
- 쓰기마다 전체 배열 복사 (느림, 메모리 사용 증가)
- 메모리 오버헤드 (두 개 버전이 잠시 공존)
- 쓰기가 많으면 성능 급격히 저하
사용 기준:

출처: Java Documentation - CopyOnWriteArrayList, Baeldung - CopyOnWriteArrayList Guide
3. BlockingQueue
3.1 개념: Producer-Consumer 패턴
BlockingQueue는 큐가 비었을 때 대기, 큐가 꽉 찼을 때 대기하는 기능을 제공합니다.
import java.util.concurrent.BlockingQueue;import java.util.concurrent.ArrayBlockingQueue;
public class ProducerConsumer { private BlockingQueue<Task> queue = new ArrayBlockingQueue<>(10);
// Producer 스레드 public void producer() throws InterruptedException { Task task = createTask(); queue.put(task); // 큐가 꽉 차면 대기 (블록) }
// Consumer 스레드 public void consumer() throws InterruptedException { Task task = queue.take(); // 큐가 비면 대기 (블록) process(task); }}내부 구조 (간소화):
public class ArrayBlockingQueue<E> { private final Object[] items; private int count; // 현재 요소 수
private final Lock lock = new ReentrantLock(); private final Condition notEmpty = lock.newCondition(); private final Condition notFull = lock.newCondition();
public void put(E e) throws InterruptedException { lock.lock(); try { while (count == items.length) { notFull.await(); // 꽉 참: 대기 } enqueue(e); notEmpty.signal(); // Consumer 깨우기 } finally { lock.unlock(); } }
public E take() throws InterruptedException { lock.lock(); try { while (count == 0) { notEmpty.await(); // 비어있음: 대기 } E item = dequeue(); notFull.signal(); // Producer 깨우기 return item; } finally { lock.unlock(); } }}3.2 BlockingQueue 구현체들
3.2.1 ArrayBlockingQueue
특징: 고정 크기 배열 기반
BlockingQueue<Task> queue = new ArrayBlockingQueue<>(100); // 최대 100개
// 용량 초과 시 대기queue.put(task); // 블록queue.offer(task, 1, TimeUnit.SECONDS); // 1초 타임아웃사용 사례: 백프레셔(Backpressure) 제어가 필요한 경우
// API 요청 처리 제한public class RateLimitedApiHandler { private BlockingQueue<ApiRequest> queue = new ArrayBlockingQueue<>(1000);
public boolean handleRequest(ApiRequest request) { // 큐가 꽉 차면 거부 (서버 과부하 방지) return queue.offer(request); }}3.2.2 LinkedBlockingQueue
특징: 링크 노드 기반, 용량 제한 가능 (기본 무제한)
BlockingQueue<Task> unbounded = new LinkedBlockingQueue<>(); // 무제한BlockingQueue<Task> bounded = new LinkedBlockingQueue<>(100); // 100개 제한내부 최적화:
// 두 개의 락으로 성능 향상class LinkedBlockingQueue<E> { private final ReentrantLock takeLock = new ReentrantLock(); private final ReentrantLock putLock = new ReentrantLock();
// put과 take가 동시에 실행 가능!}사용 사례: ThreadPoolExecutor의 기본 작업 큐
3.2.3 PriorityBlockingQueue
특징: 우선순위 기반 (힙 구조)
// 우선순위 작업 큐BlockingQueue<Task> queue = new PriorityBlockingQueue<>(10, (t1, t2) -> Integer.compare(t2.priority, t1.priority) // 높은 우선순위 먼저);
queue.put(new Task("Low", 1));queue.put(new Task("High", 10));queue.put(new Task("Medium", 5));
queue.take(); // "High" (우선순위 10)queue.take(); // "Medium" (우선순위 5)queue.take(); // "Low" (우선순위 1)3.2.4 SynchronousQueue
특징: 용량이 0인 큐 (직접 핸드오프)
BlockingQueue<Task> queue = new SynchronousQueue<>();
// Producerqueue.put(task); // Consumer가 take() 호출할 때까지 블록
// ConsumerTask task = queue.take(); // Producer가 put() 호출할 때까지 블록사용 사례: Cached ThreadPool
// Executors.newCachedThreadPool() 내부 구조ThreadPoolExecutor executor = new ThreadPoolExecutor( 0, Integer.MAX_VALUE, 60L, TimeUnit.SECONDS, new SynchronousQueue<>() // 작업을 바로 스레드에 전달);3.3 실무 예제: 비동기 로그 처리
import java.util.concurrent.*;
public class AsyncLogger { private BlockingQueue<LogMessage> queue = new LinkedBlockingQueue<>(10000); private volatile boolean running = true;
// 로거 시작 public void start() { Thread writerThread = new Thread(() -> { while (running || !queue.isEmpty()) { try { LogMessage msg = queue.poll(1, TimeUnit.SECONDS); if (msg != null) { writeToFile(msg); // I/O 작업 } } catch (InterruptedException e) { Thread.currentThread().interrupt(); break; } } }); writerThread.setDaemon(false); writerThread.start(); }
// 로그 기록 (논블로킹) public void log(String message) { LogMessage msg = new LogMessage(message, System.currentTimeMillis());
// offer: 큐가 꽉 차면 false 반환 (블록하지 않음) if (!queue.offer(msg)) { System.err.println("Log queue full, dropping message: " + message); } }
// 종료 public void shutdown() { running = false; }
private void writeToFile(LogMessage msg) { // 파일에 쓰기 (느린 I/O) }}출처: Java Documentation - BlockingQueue, Baeldung - Guide to BlockingQueue
4. 고급 락 메커니즘
4.1 ReentrantLock
synchronized보다 더 유연한 락입니다.
import java.util.concurrent.locks.ReentrantLock;
public class Counter { private final ReentrantLock lock = new ReentrantLock(); private int count = 0;
// 기본 사용 public void increment() { lock.lock(); try { count++; } finally { lock.unlock(); // 반드시 finally에서 해제 } }
// tryLock: 데드락 방지 public boolean tryIncrement() { if (lock.tryLock()) { try { count++; return true; } finally { lock.unlock(); } } return false; // 락 획득 실패 }
// 타임아웃 public boolean incrementWithTimeout() throws InterruptedException { if (lock.tryLock(1, TimeUnit.SECONDS)) { try { count++; return true; } finally { lock.unlock(); } } return false; // 1초 안에 락 획득 못함 }
// 인터럽트 가능 public void incrementInterruptibly() throws InterruptedException { lock.lockInterruptibly(); // 인터럽트 가능 try { count++; } finally { lock.unlock(); } }}synchronized vs ReentrantLock:
| 기능 | synchronized | ReentrantLock |
|---|---|---|
| 자동 해제 | O (예외 시 자동) | X (finally 필수) |
| tryLock | X | O |
| 타임아웃 | X | O |
| 인터럽트 | 제한적 (wait() 중에는 가능, 락 획득 대기 중 불가) | O |
| 공정성(fairness) | X | O |
| Condition 변수 | 제한적 (wait/notify 1개만) | O (여러 개 가능) |
공정한 락 (Fair Lock):
ReentrantLock fairLock = new ReentrantLock(true); // FIFO 순서 보장
// 대기 순서대로 락 획득// 단점: 성능 저하 (컨텍스트 스위칭 증가)4.2 ReadWriteLock
읽기는 동시에, 쓰기는 배타적으로
import java.util.concurrent.locks.ReadWriteLock;import java.util.concurrent.locks.ReentrantReadWriteLock;
public class CachedData { private final ReadWriteLock rwLock = new ReentrantReadWriteLock(); private Map<String, String> cache = new HashMap<>();
// 읽기: 여러 스레드 동시 실행 가능 public String get(String key) { rwLock.readLock().lock(); try { return cache.get(key); } finally { rwLock.readLock().unlock(); } }
// 쓰기: 배타적 실행 public void put(String key, String value) { rwLock.writeLock().lock(); try { cache.put(key, value); } finally { rwLock.writeLock().unlock(); } }}동작 원리:
읽기 락 보유 중: - 다른 읽기 락 획득 가능 - 쓰기 락 획득 불가능
쓰기 락 보유 중: - 다른 읽기 락 획득 불가능 - 다른 쓰기 락 획득 불가능실무 예제: 캐시 구현
public class Cache<K, V> { private final ReadWriteLock rwLock = new ReentrantReadWriteLock(); private final Map<K, V> cache = new HashMap<>();
public V get(K key) { rwLock.readLock().lock(); try { V value = cache.get(key); if (value != null) { return value; } } finally { rwLock.readLock().unlock(); }
// 캐시 미스: 쓰기 락으로 전환 rwLock.writeLock().lock(); try { // Double-check (다른 스레드가 이미 로드했을 수 있음) V value = cache.get(key); if (value == null) { value = loadFromDatabase(key); cache.put(key, value); } return value; } finally { rwLock.writeLock().unlock(); } }
public void invalidate(K key) { rwLock.writeLock().lock(); try { cache.remove(key); } finally { rwLock.writeLock().unlock(); } }}4.3 StampedLock (Java 8+)
ReadWriteLock보다 더 빠른 낙관적 읽기를 제공합니다.
import java.util.concurrent.locks.StampedLock;
public class Point { private final StampedLock sl = new StampedLock(); private double x, y;
// 낙관적 읽기: 가장 빠름 public double distanceFromOrigin() { long stamp = sl.tryOptimisticRead(); // 락 없이 stamp 획득 double currentX = x; double currentY = y;
if (!sl.validate(stamp)) { // 쓰기가 발생했음: 읽기 락으로 재시도 stamp = sl.readLock(); try { currentX = x; currentY = y; } finally { sl.unlockRead(stamp); } }
return Math.sqrt(currentX * currentX + currentY * currentY); }
// 쓰기 public void move(double deltaX, double deltaY) { long stamp = sl.writeLock(); try { x += deltaX; y += deltaY; } finally { sl.unlockWrite(stamp); } }}세 가지 모드:
- Optimistic Read: 락 없음 (가장 빠름, 검증 필요)
- Read Lock: 공유 락 (여러 스레드 가능)
- Write Lock: 배타 락 (하나만 가능)
주의사항:
- 재진입 불가능: 같은 스레드에서 락을 다시 획득하면 데드락이 발생합니다 (ReentrantLock과 달리 재진입을 지원하지 않음)
출처: Java Documentation - ReentrantLock, Java Documentation - ReadWriteLock, Java Documentation - StampedLock
5. Atomic 클래스들
5.1 AtomicInteger / AtomicLong
락 없이 원자적 연산을 수행합니다.
import java.util.concurrent.atomic.AtomicInteger;
public class AtomicCounter { private AtomicInteger count = new AtomicInteger(0);
public void increment() { count.incrementAndGet(); // 원자적 증가 }
public int get() { return count.get(); }
// CAS 사용 예제 public boolean compareAndSetTo100() { int current = count.get(); return count.compareAndSet(current, 100); }}내부 구현 (간소화):
// 간소화된 코드 — Java 8+에서는 Unsafe.getAndAddInt()를 사용하며,// Java 9+에서는 VarHandle 기반으로 변경되었다public class AtomicInteger { private volatile int value;
public final int incrementAndGet() { int current, next; do { current = value; next = current + 1; } while (!compareAndSet(current, next)); // CAS 루프 return next; }
// native 메서드 (하드웨어 CAS 사용) public final native boolean compareAndSet(int expect, int update);}성능 비교:
// 1. synchronized: 느림 (락 오버헤드)private int count = 0;public synchronized void increment() { count++;}
// 2. AtomicInteger: 빠름 (락 프리)private AtomicInteger count = new AtomicInteger(0);public void increment() { count.incrementAndGet();}
// 3. LongAdder: 매우 빠름 (경쟁이 심할 때)private LongAdder count = new LongAdder();public void increment() { count.increment();}5.2 LongAdder (Java 8+)
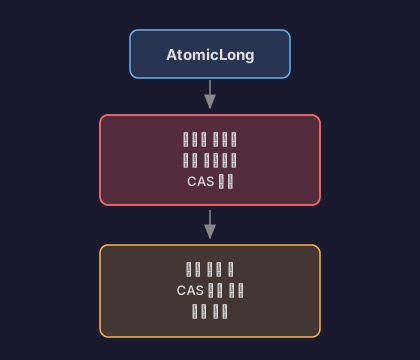
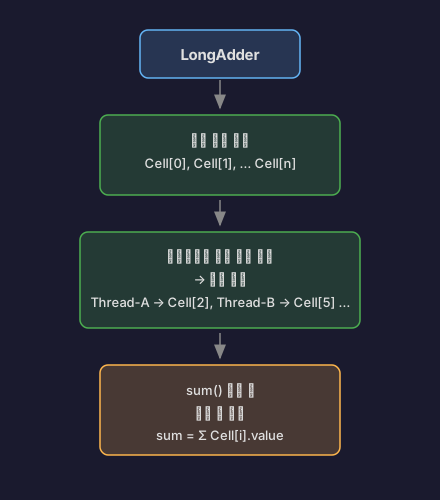
고경쟁 상황에서 AtomicLong보다 빠릅니다.
import java.util.concurrent.atomic.LongAdder;
public class HighContentionCounter { private LongAdder count = new LongAdder();
// 여러 스레드가 동시에 호출해도 매우 빠름 public void increment() { count.increment(); }
// 최종 합계 public long sum() { return count.sum(); // 느림 (모든 셀 합산) }}동작 원리:
AtomicLong
LongAdder
사용 기준:
- AtomicLong: 읽기가 많고 경쟁이 적을 때
- LongAdder: 쓰기가 많고 경쟁이 심할 때 (sum() 호출 드물어야 함)
5.3 AtomicReference
객체 참조를 원자적으로 업데이트합니다.
import java.util.concurrent.atomic.AtomicReference;
public class ImmutableCache { private AtomicReference<ImmutableMap<String, String>> cache = new AtomicReference<>(ImmutableMap.of());
public void put(String key, String value) { ImmutableMap<String, String> oldCache, newCache; do { oldCache = cache.get(); newCache = ImmutableMap.<String, String>builder() .putAll(oldCache) .put(key, value) .build(); } while (!cache.compareAndSet(oldCache, newCache)); }
public String get(String key) { return cache.get().get(key); }}출처: Java Documentation - AtomicInteger, Java Documentation - LongAdder
6. 동시성 유틸리티
6.1 CountDownLatch
여러 스레드가 특정 개수만큼 완료될 때까지 대기합니다.
import java.util.concurrent.CountDownLatch;
public class ParallelTaskRunner { public void runTasks() throws InterruptedException { int numTasks = 5; CountDownLatch latch = new CountDownLatch(numTasks);
// 5개 작업 시작 for (int i = 0; i < numTasks; i++) { new Thread(() -> { doWork(); latch.countDown(); // 카운트 감소 }).start(); }
// 모든 작업이 완료될 때까지 대기 latch.await(); System.out.println("All tasks completed!"); }}
// 실무 예제: 애플리케이션 시작 대기public class Application { private CountDownLatch startupLatch = new CountDownLatch(3);
public void start() throws InterruptedException { // 3개 서비스 시작 new Thread(() -> { initDatabase(); startupLatch.countDown(); }).start();
new Thread(() -> { initCache(); startupLatch.countDown(); }).start();
new Thread(() -> { initMessageQueue(); startupLatch.countDown(); }).start();
// 모든 서비스가 준비될 때까지 대기 startupLatch.await(); System.out.println("Application ready!"); }}6.2 CyclicBarrier
여러 스레드가 특정 지점에서 만날 때까지 대기 (재사용 가능)
import java.util.concurrent.CyclicBarrier;
public class ParallelMergeSort { public void sort(int[] array) throws Exception { int numThreads = 4; CyclicBarrier barrier = new CyclicBarrier(numThreads, () -> { // 모든 스레드가 barrier에 도달하면 실행 System.out.println("All threads reached barrier!"); });
for (int i = 0; i < numThreads; i++) { int start = i * (array.length / numThreads); int end = (i + 1) * (array.length / numThreads);
new Thread(() -> { sortPartition(array, start, end); try { barrier.await(); // 다른 스레드 대기 } catch (Exception e) { e.printStackTrace(); } }).start(); } }}CountDownLatch vs CyclicBarrier:
- CountDownLatch: 한 번만 사용, 작업 완료 대기
- CyclicBarrier: 재사용 가능, 스레드 동기화 지점
6.3 Semaphore
제한된 자원에 대한 접근 제어
import java.util.concurrent.Semaphore;
// 커넥션 풀public class ConnectionPool { private Semaphore semaphore; private List<Connection> connections;
public ConnectionPool(int size) { this.semaphore = new Semaphore(size); this.connections = new ArrayList<>(size); for (int i = 0; i < size; i++) { connections.add(createConnection()); } }
public Connection acquire() throws InterruptedException { semaphore.acquire(); // 허가 획득 (없으면 대기) return getConnection(); }
public void release(Connection conn) { returnConnection(conn); semaphore.release(); // 허가 반환 }}
// API Rate Limiterpublic class RateLimiter { private Semaphore semaphore;
public RateLimiter(int requestsPerSecond) { this.semaphore = new Semaphore(requestsPerSecond);
// 1초마다 허가 리필 ScheduledExecutorService scheduler = Executors.newScheduledThreadPool(1); scheduler.scheduleAtFixedRate(() -> { semaphore.release(requestsPerSecond - semaphore.availablePermits()); }, 1, 1, TimeUnit.SECONDS); }
public boolean tryAcquire() { return semaphore.tryAcquire(); }}출처: Java Documentation - CountDownLatch, Java Documentation - CyclicBarrier, Java Documentation - Semaphore
정리
Java 동시성 도구 선택 가이드:
컬렉션:
- HashMap 대체 →
ConcurrentHashMap - ArrayList 대체 (읽기 많음) →
CopyOnWriteArrayList - 작업 큐 →
BlockingQueue(ArrayBlocking, LinkedBlocking, Priority)
락:
- 기본 →
synchronized - tryLock, 타임아웃 필요 →
ReentrantLock - 읽기 많고 쓰기 적음 →
ReadWriteLock - 읽기 매우 많음 →
StampedLock(낙관적 읽기)
Atomic:
- 단순 카운터 →
AtomicInteger,AtomicLong - 고경쟁 카운터 →
LongAdder - 객체 참조 →
AtomicReference
동기화:
- 작업 완료 대기 →
CountDownLatch - 스레드 동기화 지점 →
CyclicBarrier - 자원 제한 →
Semaphore
참고 자료
공식 문서
- Java Documentation - java.util.concurrent Package - 동시성 패키지 전체 개요
- Java Documentation - ConcurrentHashMap - ConcurrentHashMap API
- Java Documentation - CopyOnWriteArrayList - CopyOnWriteArrayList API
- Java Documentation - BlockingQueue - BlockingQueue 인터페이스
- Java Documentation - ReentrantLock - ReentrantLock API
- Java Documentation - ReadWriteLock - ReadWriteLock 인터페이스
- Java Documentation - StampedLock - StampedLock API (Java 8+)
- Java Documentation - AtomicInteger - AtomicInteger API
- Java Documentation - LongAdder - LongAdder API (Java 8+)
이론 및 개념
- Wikipedia - Concurrent data structure - 동시성 자료구조 개요
- Wikipedia - Compare-and-swap - CAS 알고리즘
- Wikipedia - Lock-free and wait-free algorithms - 락 프리 알고리즘
기술 자료
- Baeldung - Guide to ConcurrentHashMap - ConcurrentHashMap 상세 가이드
- Baeldung - CopyOnWriteArrayList Guide - CopyOnWriteArrayList 사용법
- Baeldung - Guide to BlockingQueue - BlockingQueue 구현체 비교
- Baeldung - Guide to java.util.concurrent.Locks - Java Lock 인터페이스
- Baeldung - Guide to CountDownLatch - CountDownLatch 활용
- GeeksforGeeks - ConcurrentHashMap in Java - ConcurrentHashMap 기초
- GeeksforGeeks - BlockingQueue Interface in Java - BlockingQueue 개념
성능 및 내부 구조
- DZone - How ConcurrentHashMap Works Internally in Java - ConcurrentHashMap 내부 동작
- Java Concurrency in Practice - Brian Goetz의 Java 동시성 바이블
한국 기술 블로그
- Tecoble - HashMap vs HashTable vs ConcurrentHashMap - HashMap 내부 구조와 동시성 처리
- 우아한형제들 기술블로그 - Java의 미래, Virtual Thread - 최신 Java 동시성 기술 (Project Loom)
- JDM’s Blog - Hashtable, HashMap, ConcurrentHashMap 비교 - HashMap과 ConcurrentHashMap 비교
- 컬리 기술블로그 - Redis를 활용한 분산락 구현 - Redis 분산 락 실무 적용
- Hudi Blog - Redis로 분산 락을 구현해 동시성 이슈를 해결해보자 - 분산 환경에서의 동시성 제어

댓글
댓글 수정/삭제는 GitHub Discussions에서 가능합니다.